Dave Moulton

Dave's Bike Blog

Award Winning Site

More pictures of my past work can be viewed in the Photo Gallery on the Owner's Registry. A link is in the navigation bar at the top

Bicycle Accident Lawyer


Powered by Squarespace
Search Dave's Bike Blog


 Watch Dave's hilarious Ass Song Video.

Or click here to go direct to YouTube.


A small donation or a purchase from the online store, (See above.) will help towards the upkeep of my blog and registry. No donation is too small.

Thank you.

Join the Registry

If you own a frame or bike built by Dave Moulton, email details to list it on the registry website at www.davemoultonregistry.com

Email (Contact Dave.)

 If you ask me a question in the comments section of old outdated article, you may not get an answer. Unless the article is current I may not even see it. Email me instead. Thanks Dave

Entries in Framebuilding (38)

Monday
Dec102007

In search of the perfect fork blade


When a fork blade comes from the tube manufacturer’s factory, it is straight; the framebuilder bends it to a curve that suits his requirements.

An un-raked road fork blade is oval at the top; the oval section runs parallel for about a third of its length. Then the cross section becomes round and starts to taper gradually to its smallest section at the bottom end.

The fork blade is bent on a curved form that is sometimes made from hard wood. I used one I made myself from two heavy-duty steel fork blades, bent in the desired curve, and brazed together side by side. This made a natural grove between the two blades where the blade would sit as I was bending.

I would slip a short piece of tube over the thin end of the form and the blade I was bending to hold it in place. Then start bending, first by pushing down by hand. The thin end of the blade bends easily, and I would finish off by squeezing it in a vise.

Bicycle tubing is hardened, and it will spring back after bending. Because of this, the form needs to be a greater curve than the finished fork blade will be.

A fork blade is several inches longer than it needs to be. The framebuilder chooses where he will put the bend, and where he will cut to length. For example, if I were making a criterium frame and wanted a very stiff fork, I would cut from the bottom, thin end.

If I were building a touring frame, and wanted a flexible fork for a more comfortable ride, I would cut from the top end and leave the blade thin at the bottom end. The framebuilder creates the perfect fork blade, by selecting the best place to bend the blade, and by choosing how much to cut from either end.

It is rather like a furniture maker choosing where to cut from a piece of wood to achieve the best end product. Once I arrived at the perfect fork blade, it was then an easy matter to repeat the process again and again.

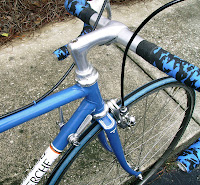
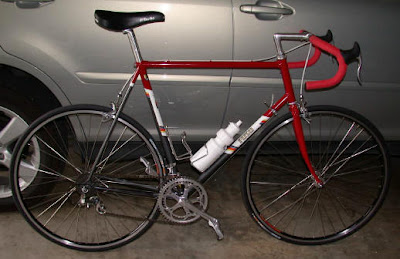
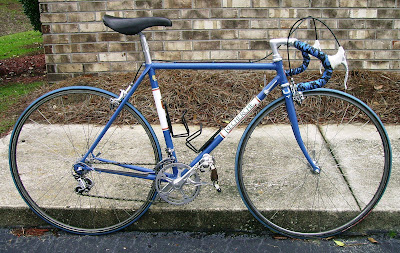
On a John Howard
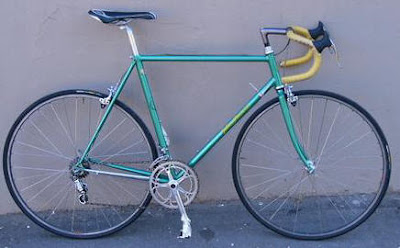
On a Fuso

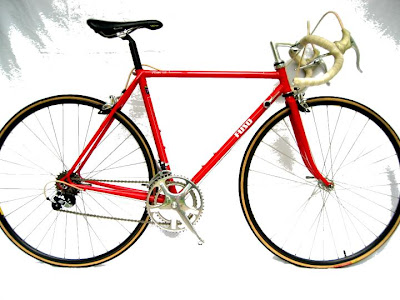
And on a Recherche

One exception to this process was the Reynolds 753 fork blades. 753 was heat treated to a degree that the material could not be bent after. These were bent at the factory, then heat treated, and the framebuilder then cut to the required length. You will notice on the 753 Fuso Lux frame (Pictured below.) that the fork bend is a different shape than the ones bent by me. More pictures of this bike can be seen here.
Chainstays and seatstays are also tapered and the same selective cutting to length is employed. In this case, where the cut is made depends a great deal on the size of frame and its end use.

The perfect fork blade is stiff enough to allow precise handling, but with some flex to absorb road shocks. It also looks pleasing to the eye. I have a theory that when something is designed correctly from a functional standpoint, it has a natural aesthetic beauty. This is true of a boat, a bridge, a building, and even a bicycle frame.

The modern trend of building straight forks of course saves the framebuilder a great deal of time and effort. If this look has become acceptable, why should today’s builder go through all the time consuming process I have described here?

The straight blade is angled forward so the same fork rake or offset is achieved and handling would be the same. I can’t comment on the shock absorption qualities because I have never built a frame with a straight fork.

In my view, a great deal is lost aesthetically, so where does that leave my theory about function being linked to aesthetics? On the other hand, is it simply that beauty is in the eye of the beholder?

Friday
Nov302007

Down in the Bicycle Forest, something stirred


It can’t be the last day of November; did someone break into my house and steal some days from my calendar?

It used to be there were not enough hours in the day, now this has escalated to not enough days month, or worse not enough months in the year.

Meanwhile there are others in this world who seem to have too much time on their hands; like the people over at The Bicycle Forest. Otherwise, how would they come up with such brilliant concepts like the Treadmill Bike? (Left.)

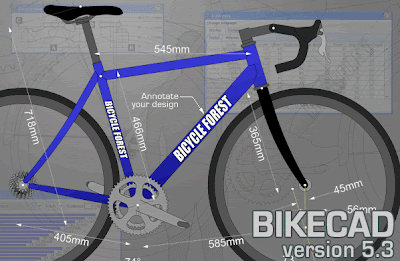
Now they have this really cool (Or is kewel.) Bike Cad program so you can design your own bike.

And it’s free. Personally, I do not need free stuff to steal more of my time; what I need is more free time, period.

Therefore, I pass it on and let you play with it, as you obviously have more time than I do, otherwise you wouldn’t be reading this blog when you should be working. (If you are not at work, there must be something useful you could be doing.)

Moreover, my design program in my head still works, and mine works at any time so I can multi-task while riding my bike, driving, listening to my wife, etc.

One of the things you can do with Bike Cad is explore “toe overlap.” Judging by the number of times the subject gets Googled, and people arrive here, some are convinced that it is: (a) a design flaw, (b) something bike manufacturers do to save money, or (c) something bike manufacturers do just so people can fall down, then sue their ass.

Some also think this is something new; however, it has been around since the 1970s. Ever since, we stopped building bikes with those horrendous 2 ½ or 3 inches of fork rake. The cure is to go back to those long curved forks, and bikes that handle like a fucking wheelbarrow.

Now, thanks to Bike Cad, no one has to take my word for it. They can find out for themselves that toe overlap is unavoidable on smaller size frames. If you happen to find a cure for this non-problem, don’t send it to me, send it to Richard Sachs as I’m sure he would appreciate it.

Seriously, Bike Cad does seem to be something useful that will bring hours of fun. As for me, I have too much fun already, and not enough hours.

Friday
Nov162007

Straightening bent seatstays


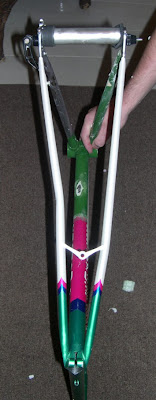
I received the following email the other day, with pictures attached:

I was looking through your blogs (great stuff by the way!), and was wondering if you could lend me some insight.

I too am a steel bike rider and have a special fondness for Eddy Merckx bikes. One of my frames was bent by a shipper while en-route to a painter.

I collected insurance, and hung the bent frame on the wall with some other out-to-pasture items.

Now two years later, I figured I need another winter beater bike, and thought the frame wasn't that bad.

My friend suggested some wood blocks with carved out grooves the same diameter as the stays bolted around very close to the bends, clamping the frame with wood vices, and a very slow pressure to try to bend her back.

We're questioning the use of heat. Would that weaken the steel even more?

I know this will never be a racer or every-day bike again, but I hate to leave it hanging, and I really need another beater bike.

Thanks in advance,
Dave Whitney (davefromaine)

--------------------------

Dear Dave from Maine,

Never use heat to straighten tubes, you will end up with a kink in the tube, or it will crack and split. You could straighten it the way your friend suggests, but there is an easier way.

Leave the spacer shown between the rear dropouts, if you don’t have a spacer cut a piece of wood to fit tight between the rear ends.

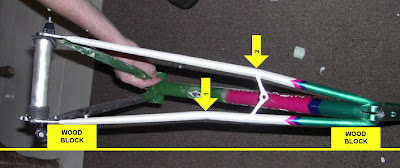
Lay the frame on the floor with wood blocks (cut from 2 x 4.) positioned as shown below.


Apply pressure with your foot at the point where the bend is (1.); in other words stand on it wearing a rubber sole shoe like a sneaker. Do it gently at first, depending how heavy you are, it will not take much.

I notice the left seatstay is also bent at the brake bridge. (2.) In all probability this will straighten as you apply pressure to point 1. If needed apply some pressure to point 2.

Check for straightness by looking down the seatstays from the top or bottom. Close one eye as if you are looking down a gun barrel.

If there is a dent in the tube this should not affect it structurally, and if you have the frame repainted in the future it can be filled with brass, and filed to the contour of the tube.

Finally do a string check for alignment. Tie a piece of string from the rear dropout on one side of the frame. Run the string around the head tube of the frame, and tie the sting to the opposite rear dropout. With the string stretched tight, measure from the string to the seat tube on either side. The measurement should be equal.

And you are good to go. That's the great thing about a steel frame; it is easy to fix.

Footnote:
When I worked at Paris Sport in NJ, a customer came in with a frame with bent seatstays exactly like the one shown here.

He asked, “Can you straighten this?” after I told him I could he asked, “How long will it take?”

“Couple of minutes.” I told him.
“Do you have a special tools to do this?”
“Yes, they are so special I keep them in leather cases.”

And I proceeded to straighten the frame as I described above, and handed it back to him two minutes later as promised.


Friday
Oct052007

Lugs

A bike store owner told me recently told me of a young customer in his store looking at a 1980s vintage steel bike that was in for a service. He pointed to the lugs and asked the store owner, “What are these for?”

I find it amazing that a method of building bicycles can be around for over a 100 years, and become lost to a new generation in ten years or so.

Since the bicycle’s invention in the late 1800s the traditional way to join steel tubes to make a bicycle frame was by melting brass into a lugged joint. Similar in a way to a plumber joining copper pipe by sliding the pipe into a pipefitting, heating, and filling the joint with solder.

Brazing, as it is known, done at a higher temperature and the resulting joint is much stronger. Early lugs were in fact pipefittings; these were heavy steel sand castings, cut square at the edges, and machined on the inside to fit the tube.

As steel tubing for bicycles became thinner and lighter, it was found the tube would sometimes break at the edge of the lug. This was because the lug was far stronger than the tube.

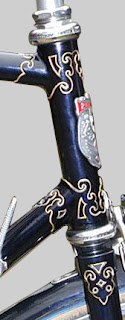
In any structure, if you make a joint far stronger than the parent material, the material will fail during stress, immediately adjacent to the joint. Framebuilders started filing the lugs thinner to bring the strength closer to that of the tube. For the same reason, they also started cutting the lugs into fancy shapes to eliminate the square edge of the lug.


By the 1950s the cutting and filing of lugs became the way a framebuilder would express his art and individuality. Hetchins (Left.) were one of the first to take this art to extremes.

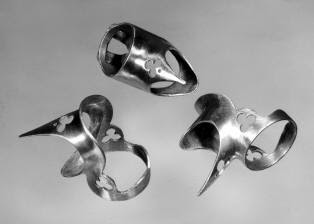
By the 1960s and 1970s, fancy lugwork became too costly and lugs stamped from sheet steel and welded, became available. The top picture is a set of pressed steel lugs that I prepared during the 1970s, with some custom shaping a cutout work.

By the 1980s “Investment” cast lugs became available. A method developed for the aircraft industry, investment casting was achieved by first hand making a lug. From this “pattern” lug a simple plaster mould was made.

A lug made of wax was cast in the plaster mold; this in turn was coated in a ceramic material and fired in an oven. The firing hardened the ceramic coating and at the same time melted the wax from inside, leaving a void the perfect shape of a lug.

Molten steel was poured into the mold, and when cooled the ceramic mold had to be broken to remove the finished lug, hence the name, “Investment” casting. An expensive process, but the finished lug was near perfect, the tubes fit with no machining required; very little filing required from the framebuilder. Lugs, bottom bracket shells, and fork crowns are made this way.

Traditionally frames were never welded. Not because welding was not strong enough but rather the heat required to weld weakened the parent material adjacent to the weld. By the 1980s welding technology had advanced to where it could have been used to build lightweight frames. However, at the time customers, connoisseurs of the lugged frame would not accept it.

This changed during the “death” of the road bike in the early 1990s. Mountain bike manufactures could get away with the quicker and cheaper welding process, because the MTB was new and there were not the old standards, and traditions to break down. There was a whole new generation who grew up with welded BMX bikes.

When the road bike was reborn, sadly, for some of us it was an ugly bastard. Its gene pool contaminated by MTB and BMX, the beauty, style and class bred out of it. A well, that is I suppose the price we pay for progress.


Tuesday
Feb272007

Abandon or Repair?

Here is a quote from an email I received after my recent post about a severely damaged Masi frame sold on eBay.

“I am certain other readers of your blog would be interested in you expounding a little more on where you consider the break to occur between abandon and repair, and the salient factors you would consider.”

Probably the best way for me to answer this question is to explain what is involved in repairing a lugged steel frame, and how I would approach it.

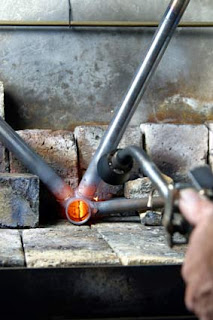
The easiest tubes to replace are the top and down tubes. I would cut the damaged tube with a hacksaw a few inches from the lug. Heat the lug uniformly, and to do this I would often use two oxy-acetylene torches, one in each hand on either side of the lug.

With one torch heating first one side then the other, one side will cool as you move to the opposite side. If you don’t have the luxury of two torches, then a simple hearth made out of fire bricks, to hold the heat, is called for.

[Left: Brazing Hearth. Picture from Mercian Cycles.]

If you don’t heat the joint uniformly you risk breaking the lug. With everything at uniform heat, (Orange red for brass, dark red for silver.) you can simply grab the short piece of tube with pliers, twist, and it will slide right out.

Some framebuilders pin the lugs to ensure they don’t move during brazing, so you need to look to see if there is a pin sticking through inside the tube. If there is, reach in and grab it with a pair of needle nose pliers, heat the spot on the outside where the pin is, and pull the pin through inside to remove. Then you can go ahead and remove the piece of damaged tube.

After the frame has cooled, the inside of the lug can be cleaned up using a carbide burr in a hand held grinder. With a tube removed the frame is very flexible and will easily spring apart to allow the replacement tube to be inserted.

The most difficult tube to replace is the seat tube. It is a simple matter to hacksaw the damaged tube out and remove the lower piece from the bottom bracket. However, removing the piece of tube from the seat lug is a completely different story.


To heat this area uniformly you are going to melt the joint where the seatstays are attached to the seat lug, and in all probability, the seat lug will move or come off the top tube.

Some repair shops have a set up where they can machine out the piece of seat tube using a reamer or correct size milling cutter. This way no heat is used in the removal of the old tube, but you still need to exercise caution in re-brazing the joint. Care is needed so you don’t melt other parts of the joint.

The way I approached this repair, was to replace the seat tube complete with a new seat lug. This way I could cut out the damaged tube, and hacksaw the seat lug on either side of each seatstay.

Next I would heat and detach the rear brake bridge on one side only, and spread the seatstays apart by inserting a six inch piece of wood between them. Then the cut pieces of seat lug still attached to the top of each seat stay could be removed by heating from the inside without melting the entire seat stay cap.

The final piece of seat lug had to be removed from the top tube by heating uniformly and then pulling it off with pliers. After cooling and clean-up, it is a relatively easy matter to put the new seat tube in place, along with the new seat lug, and re-braze everything in the normal way.

It is rare to have to replace a chainstay or a seatstay, but these would be cut out with a hacksaw and the remaining pieces removed by heat. It is often easier to replace a both seat stays, even if only one is damaged, rather than try to match one new one to an existing seatstay.

Slightly bent seatstays can be safely straightened, (Providing they are not kinked.) as can front fork blades. These are much thicker that the main frame tubes.

I would only repair my own frames, and did this as a service rather than as a money making proposition; most other framebuilders are the same. A big consideration is not so much, can a frame be repaired, but can you find a reputable framebuilder to do the work, and what will be the cost?

I fail to see where buying a damaged frame on eBay or anywhere else is a worthwhile proposition. With used steel frames still plentiful and at reasonable prices, in most cases the only reason to repair a frame would be one of extreme sentimental value.

The frame pictured at the top is my own Fuso frame damaged in my accident last December. The frame cost me $260, and if I can find another for close to that price it would clearly be less than the cost of a repair and re-paint. On the other hand, it may be difficult to find another in this size (52 cm.) so I may have to consider having it repaired.