


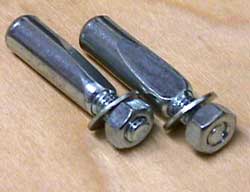
Cotter Pins
 The racing bicycle developed through the 1920s and 1930s, becoming increasingly sleek and lightweight.
However, aluminum alloy was not widely used for bicycle components as it was considered unreliable at that time.
All this changed in the 1940s due to WWII and aircraft production; huge strides were made in metallurgy and improvements made in aluminum alloys.
However, there was reluctance immediately after the war, both by manufacturers and consumers to use these new alloys for high stress bicycle components like cranksets.
My first race bike that I bought in the early 1950s had steel cranks, held to the bottom bracket axel with cotter pins; a somewhat crude method of attachment that had been around since the early days of the bicycle.
Never-the-less the cotter pin was cheap, simple and reliable, providing they were fitted correctly. I used to buy my cotter pins “Plain,” and file my own flats on them.
The procedure was to file a flat, tap it into the hole in the crank arm using a hammer; the relatively soft cotter pin would butt up against the hardened surface of the flat on the bottom bracket spindle.
This would create a shiny spot on the flat of the cotter pin; the pin would be removed and the shiny spot would then be filed off, and the pin refitted.
 This was repeated until there was perfect contact along the entire flat portion of the cotter pin.
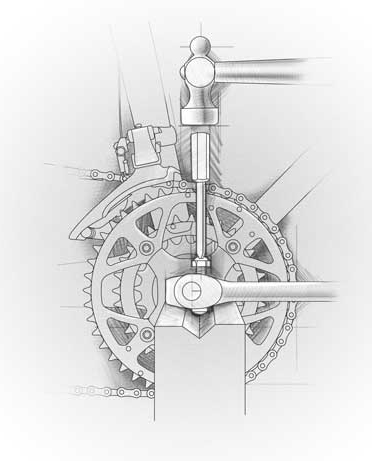
Periodically, usually before an important race the cotter pins were driven out, making sure there was a block of wood under the crank arm, (Right.)
This was so the frame or the BB bearings would not be damaged by hammering on the cotter pin unsupported.
The cotter pin was touched up with a file again and refitted. After several refits it was necessary to buy new cotter pins and start over.
The rule I was always taught was that “When the pedal goes down, the cotter goes up.” On the downward stroke of the crank, the nut on the cotter pin was on the top.
The idea is, when the left crank is driving the tendency is for the cotter pin to be pulled in tighter. However, the cotter pins have to be installed in opposite directions; otherwise the cranks will not be in the exact same plane.

With the BB spindle now driving the chainwheel from the left, the right cotter pin is tending to be pushed out and the only thing stopping it is the nut. So one could argue that it doesn’t matter which direction the cotters go, one of them is bound to be in the wrong direction.
All I know is I always fitted them the way I was taught, I checked them regularly and I never had a cotter come loose while I was riding.
Most people reading this will probably never have to concern themselves with a cotter pin; unless you are into collecting vintage bicycles.
But you never know you might find yourself working on an old roadster bike, and now instead of staring at a cotter pin and asking, “What do I do with this?” You at least have the basics.


 Dave Moulton
Reader Comments (23)
Interesting. I've asked about this on bike forums/lists and have seen various theories, including the one above. Another one I've read is that with the cotter head LEADING, there is less likelihood of snagging your pant leg. I have two bikes with cotters in the house right now and they both have the nuts leading. So, go figure.
My father-in-law gave me his 1960s era Robin Hood (a Raleigh in Lenton green clothes).
He hadn't ridden it in 10-15 years, and had probably never changed the lube in the bearings, so I did a total breakdown. Yes, the grease was all but dust.
Getting into the bottom bracket was murder, because we could not get the cotter pin to go free. A neighbor finally went at it with a hefty hand sledge ... a serious whack, then another, and another, and, pop, out it goes.
It was almost as hard to run down a replacement — cotter pins are scarce nowadays.
Found a long-dead honeybee in the bottom bracket ... she was a long way from Nottingham!
Another very informational read! Thanks as always master Dave. You write technical things in a manner that I can easily understand.
Rider,
To loosen a stubborn cotter pin, unscrew the nut until it is flush with the top of the threads. Place a wood block under the crank, (A piece of 2 x 4 works well.) Use a piece of steel bar or large bolt as a punch, long enough to clear the chainring, and smack it hard with a big hammer. Leaving the nut on flush with the top of the threads ensures you don’t damage the threads. You may need to reuse the cotter if you can’t find a replacement.
Dave
@Rider
Your story reminded me of another bike I worked on. I recently got an old Astra (a rebranded Motobecane) back in riding order for a friend. I ran into similar issues removing the 40yo cottered cranks but finally got them off. Then more headaches trying to get the bb removed, only to find a hundred or so dead ladybugs mummified in the bb shell. Gross, but she's back on the streets again now!
It makes sense that the cotter on the left arm is positioned so it tightens when you pedal. The left arm drives the chain by putting torque through the spindle, but the right arm drives the chain directly, just using the spindle as a rotation point. That's also why, on more modern square-taper cranks, the left arm is more likely to loosen itself than the right arm.
Hello from NYC ! I still own a cheap steel 12 speed roadie which I ride everywhere. It is a Sears Free Spirit purchased in 1987. During the summer I removed the cotters to grease the BB, the old style, axle, cups and ball bearings. I tried to hammer them out but could not support the bike enough to prevent damage. I looked around on the internet and finally decided to purchase a crank cotter press. The cotters came out with just the turn of a wrench and the new cotters went right in and were pressed in place with the same tool. It did cost me $55.00 but was worth it in the long run saving me time and aggravation. I will be happy to give you the website if you so desire. I am the proud owner of a Fuso serial # 595 built by the man himself ! Good Luck to all !
"Use a piece of steel bar or large bolt as a punch, long enough to clear the chainring"
I bought a large plain punch for exactly this task.The business end was about 3/8" round. This is obviously better than mild steel rod, because intended for the purpose. No cotter pin ever defeated it! But it has not been used for a very long time.
My bike shop days were the early '80s, so we'd occasionally work on bikes still sporting cotter pins to hold the crank arms on.
It be fair to say cranksets have come a long way since then.
Hi Dave, You brought back many memories. I started working in the bicycle industry in 1976. The shop I worked at was a Schwinn and Peugeot dealer. We had a Var brand tool cotter press. Although it was possible to use the tool for removal and installation, some bikes the cotters were in so tight we ended up heating the crank arm slightly to get them out. Usually a large hammer, brass tapered punch and wood block as you mentioned with plenty of "elbow grease" was the result. Of course most of the time the grease in the bottom bracket was dried up or melted. I replaced many bottom bracket cups, spindles and bearings more to lack of grease in the fist place from the factory. Back then even new bikes had very little grease in them. The exception were the top shelf models. I also used to hand fit cotters then. Once in a while we'd get an odball bike that required this type repair.
Thanks for the tip, Dave. I'll keep it in mind should another cottered crank end up in my garage.
Those bikes are getting harder and harder to find now, though. Now, I've got a 'self-extracting bolt" on my Octalink bottom bracket, and the hammer stays on the pegboard.
I bought a Katakura Silk brand new in 1977 in the Philippines. It has cottered cranks, and fortunately I had bought Glenn's Bicycle Repair Manual (1973), and it showed me what you just covered. I would have bet when I changed mine that they would never come out on their own. I have a set of cotters in Silk's Handlebar bag just in case. I mostly ride my Trek Madone 5.2 now.
Consider adding this to your "Best of" series. Nice suggestions that I've never seen anywhere else including your comment about protecting the threads.
Dave,
Thanks for this! I just had to replace an old unicycle crank and your directions came in very handy.
mander/ Andrew
Nice article, thanks. I'm the proud owner of a 30 yr old Dawes Diploma, hand-built in England. I have had it from new too! It has travelled with me and after spending the last 15yrs in sunny Seville, Spain, it is now just across the border in equally sunny Portugal. Alas, the left cotter pin holding on the crank arm is at its lowest point; flush with the hole and there is now some play giving me that little drop with every turn of the pedals while riding-irritating to say the least! Anyone know where I can find a new cotter pin? I want to ridw this bike for at least another 30 years!
Thanks. I had a part-time job putting bikes together in the 1970s and had almost forgotten the cotter pin :-)
The last bike I had with cotters went in the '80s. They never behaved, and I used to hate them. I was happy to get the "modern" cranks with the tapered square.
I used to think that if the bike manufacturers were going to use such a horrible arrangement, at least they could make the things strong enough.
P B
Strangely enough, subsequent to my first post I was given a nice old Peugeot mixte frame bike that fits my wife, so I set about refurbishing it. It came with a cottered crank, but missing one cotter pin. I duly hunted down some spares at a "real" bike shop, where the mechanic gave me four, saying "These are all I have - haven't used one in years".
As it turned out, I rebuilt the bike using slightly newer (and better) components, including a square-taper bottom bracket. But at least I have the original components (and a few spare cotter pins :-)
Hi Dave , I remember the cotter pins my father was a good bike rider or shall I say racer, he also was an excellent mechanic ......in those days you had to do everything by yourself to save on costs........He should me how to change cotter pins so i remember them well, he used a brass punch about 2 inches in diam. and 8 inches long not to rap your fingers or your hand in general.........my dad also was a tool and die maker so he could make a lot of the tools instesd of the high cost of bike tools in those days also.........he could build wheels wire and sodder the spokes for the track........well any way it was nice to hear your comments on cotter pins .Im selling a lot of cotter pins and old vintage stuff parts on E Bay.........
Where can you buy the cotter pins as described
Shane,
Google "Bicycle Cotter Pins for Sale"
They come in different sizes so measure the diameter required.
Dave
In the US, I get cotter pins from a vintage moped parts supplier, as Mobylettes used them for a long time. Treatland.tv is the best source.
Hi Dave.
I acquired, via a mate, a 1960 Pratt Special from the local "household waste recycling centre" (as dumps in the UK are now called).
It has cottered cranks but the pins are threaded at both ends so are self extracting by loosening the narrower end nut and tightening the wider end nut. If that makes sense. The bike had been in a shed so long, that one side of the frame is blue flam and the other side is silver.
The cotter pins, however, came out with just a turn of a spanner.
I'd imagine this also gives you two chances per crank of snagging your trouser cuffs!
Regards, Nick.