Dave Moulton

Dave's Bike Blog

Award Winning Site

More pictures of my past work can be viewed in the Photo Gallery on the Owner's Registry. A link is in the navigation bar at the top

Bicycle Accident Lawyer


Powered by Squarespace
Search Dave's Bike Blog


 Watch Dave's hilarious Ass Song Video.

Or click here to go direct to YouTube.


A small donation or a purchase from the online store, (See above.) will help towards the upkeep of my blog and registry. No donation is too small.

Thank you.

Join the Registry

If you own a frame or bike built by Dave Moulton, email details to list it on the registry website at www.davemoultonregistry.com

Email (Contact Dave.)

 If you ask me a question in the comments section of old outdated article, you may not get an answer. Unless the article is current I may not even see it. Email me instead. Thanks Dave

Entries in Framebuilding (38)

Monday
Aug192019

Marketing

David R Ball PhotoMarketing is always a tough nut for the artist.

All he wants to do is create, but then there comes a point where he must market what he creates in order to survive and continue creating.

It is tough when you have a product that you know is superior but lose sales because some large corporation has more marketing clout.

This happened many times with me in the early 1980s when customers would be on the brink of buying one of my bikes, then at the last moment opt for a Japanese Nishiki, on Centurion. Both good bicycles of that era but could never compare to a hand-built frame made by an individual craftsman.

The only reason they did this was marketing. These large manufacturers could place full page color ads in Bicycling Magazine. But at $10,000 a pop for a such an ad there was no way I could compete.

Instead I relied on bicycle dealers to sell to a small group of hard-core cyclists who could appreciate the difference between a limited production hand-built frame, and a factory mass produced item. I built a Nationwide network of these dealers by attending the Interbike Trade Show each year.

Each dealer would have bikes in stock that potential customers could test ride. Once a person test rode a Fuso, or other bike I built, and compared it to a production import bike, they could tell by the way it rode, the way it handled, this was a better bike, often for the same amount of money.

These independent bicycle dealers were my sales force, handling all the marketing for me, leaving me to spend my time building frames. For the dealer there was a 15% mark-up on a frame, not a huge amount, but when you add to this the markup on the components. Plus, back in the day, the bike store built the wheels and of course charged labor for the assembly of the bike.

It was a profitable partnership for the dealer and me, one that worked well through the 1980s, until the market changed. By the early 1990s interest switched to Mountain Bikes, which killed the road bike market.

For me to sell direct to the individual customer was a hopeless proposition. It had worked well for me in England though the 1970s, but there was a big difference in the mentality of the customer in the UK.

For a start my UK customers were almost exclusively racing cyclists. Having chosen a framebuilder, they would trust him implicitly. They would spend an hour at the most, getting measured and discussing the order. If they lived more than 75 miles away, the order would probably be sent via mail, or taken over the phone. The customer would order a frame and would most likely buy the components and assemble the bike himself.

The American customer, on the other hand, would drive hundreds of miles across state lines to visit with a framebuilder. Having done that, they would expect to spend the whole day at the shop, hanging out, watching me work, asking all manner of questions, that went way beyond the scope of the actual frame I would build for them. And there was never a gaurentee that an order would be forthcoming.

I think the big difference between the British and American customer is, the UK customer recognizes your skills but treats you as an equal. However, he respects your time and realizes it is valuable.

The American customer also recognizes your skills, but treats you like some kind of celebrity because of it, to the point at times, it is embarrassing. However, he has no respect for your time, and if he is buying your product, he expects your undivided attention that goes way beyond the time it takes to actually create that product.

It is the American way. Money talks, and the customer is King. A philosophy I never quite bought into, and was the reason I ran a strict ‘No Visitor’ policy, and sold my product through bike dealers. If I had it to do over again, I would do the same. One cannot run a profitable framebuilding business if you are spending more time talking about bikes than actually building them.

 

     To Share click "Share Article" below 

Monday
Jan152018

My Design Philosophy Explained

I look at frame specs of all the major bicycle manufactures today, and they all follow each other within certain parameters. Of course the UCI (The governing body of the sport of cycle racing.) lays out certain rules and regulations pertaining to the design of a racing bicycle. However, within these UCI rules there is a pretty wide scope for any individual to do something a little different.

Most take the safe approach and follow what their competitors are doing. It has always been that way, framebuilders do whatever is easiest for them, and bike riders make do with whatever is available. When I got into cycling in the early 1950s, the standard frame of the day was 73 head and 71 seat angle.

Sitting back that far was totally unsuited to my short stature of 5’ 6” (167 cm.) I got into framebuilding trying to build a better frame for myself. I found as soon as I made an effort, I would slide forward onto the tip of the saddle. This was not only extremely uncomfortable, it had the effect of my saddle being too low. The answer seemed simple to me. Make the top tube shorter, and the seat angle steeper, thus moving the saddle forward to where my backside wanted it to be.

Why were seat angles so shallow in the 1950s and before that? It was a throwback to the “Ordinary,” the high-wheeler that was the forerunner of the chain driven bicycle. In 1950 the chain driven bike was only 65 years old. There were still people around that had actually ridden the old high-wheeler.

By the 1960s the parallel angle frame came into vogue. By making the seat and head tube the same angle, the same size top tube could be used over several sizes, tubes could be pre-mitered, and simple frame assembly jigs could be used, thus speeding up production.

First came the 72/72 degree frame, followed a short time later by 73/73 degree angles. The reason being, people were not ready to jump from a 71 seat angle to a 73. 72 parallel was a good compromise. When people found that worked, it was an easier sell to the 73 degree parallel. 73 degrees was a better head angle anyway. That had been established as far back as the 1930s, and is still the standard today, for a road frame.

In the 1970s most Italian builders, and many English builders switched to 73 degree seat with a 75 degree head angle. No one was going back to a 71 seat angle, but having that 2 degree difference in the angle, and with the two tubes getting further away from each other as the frame got taller, was an advantage for the framebuilder. The top tube automatically became longer for the larger frames.

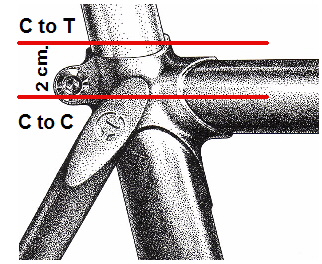
The selling point was, ‘Steeper head angle makes a livelier handling bike.’ It did indeed. Lively to the point of being dangerous for an inexperienced rider. I did not follow this trend, but instead made the top tube shorter. For example a 54 cm. frame (C to T) had a 54 cm. (C to C.) top tube.

A 55 cm. frame had a 54.5 cm. top tube, and a 56 cm. frame had a 55 cm. top tube, and so on. As the seat tube increased by one centimeter, the top tube only increased by half a centimeter.

This simple formula meant that by increasing the handlebar stem length to compensate for the decreasing top tube. It meant the front part of the handlebars was always in the same position directly above the front hub and the point where the tire contacts the road.  This was the case throughout the range of sizes. (See top of page drawing.)

When sprinting out of the saddle, there is always a certain amount of “Throwing” the bike from side to side. If the rider’s weight is directly above the tire’s point if contact, the wheel will remain straight. If the rider’s weight is ahead or behind this point of contact, any sideways movement could translate into the front wheel steering this way and that. I found with this set up, the 73 degree head angle can feel just as lively in a sprint, as the steeper angle, but without the “Squirrely” feel of the steeper bike.

Except for my very smallest size frames, 51 cm. and below. Which had a 72 degree head angle, and 38 mm. fork rake, all other sizes had a 73 degree head angle with 35mm. fork rake. This ensured the same handling characteristics for all sizes.

Above: A small 19" (49 cm.) frame, built in England in 1977. the differance in seat and head tube angles can clearly be seen. However, for a rider of small stature the riding position is more balanced than it would be if the frame were built with a shallower seat angle and a longer top tube.  

The seat angle varied from 76 degrees for the smallest frames, gradually decreasing, 75, 74, to 73 degrees for the largest sizes. This was often a hard sell to a market that had always heard 73 degree seat angles.  

What I had, (And still have today.) is a “Niche” following. I gradually built a network of bike dealers, who once they, or their employees had ridden my bikes, they were sold. It was then an easy sale to their customers, because they truly believed in the product. The proof can also be seen in the number of “Original” owners on my Registry website.

Will my ideas ever become “Mainstream.” I very much doubt it. Frames today either pop out of a mold, or they are welded steel or aluminum. There are no restrictions what-so-ever on angles or tube lengths, but most stick to the tried and safe 73/73. Any slight variation on this I feel is not done to improve handling or ride qualities, but rather to keep a balanced look throughout the range of sizes.  

Large corporations have to sell a lot of product to survive, and you can’t sell a lot of product in a “Niche” market.


     To Share click "Share Article" below.    

Monday
Jan082018

Measuring Frames

Growing up in England, and taking up the sport of cycling there, later building frames, there was only one way  to measure a bike frame and that was from the center of the bottom bracket to the top of the seat lug. It never occurred to me there was another way.

Italians measure frames from the center of the bottom bracket to the center of the top tube. However, I had very little exposure to Italian frames, there were few in the UK, I had no reason to measure one.

When I came to the US I continued measuring center to top as I had always done. One change I did make when I resumed building my own frames, I did switch from inches to centimeters. In England I had always built frames in half an inch increments. For example, 21”, 21.5”, 22” 22.5” etc.

I noticed Americans always spoke of frame sizes in Centimeters, so I switched. I always thought it strange that in a country so entrenched in Imperial measurement in every other walk of life, people would readily accept the metric system with regard to bicycles.

I continued to build frames and still no one ever questioned my method measuring, I was well into the 1980s and I gradually discovered I was in the minority, and almost everyone measured center to center. But now it was too late to change. I had hundreds of frames out there, it would have been chaotic to switch. I had no alternative but continue as I had always done.

If there is one instance in my life where I could go back and do things differently, I would have measured center to center when I started building frames again in California. It would have been no big deal. But no one told me, I didn’t know.

Working for Masi I never had to measure a frame. They had a series of “Jig Frames.” Frames built by Faliero Masi himself when he first opened his shop in California. One in every size. I would simply choose one in the size needed and use it the set the frame jig. This ensured that every Masi frame was built exactly to Masi’s design.

Also at the back of my mind I seem to remember the Masi frames were measured center to top anyway. Faliero Masi was always a bit of a rebel amongst Italian framebuilders, he used Reynolds 531 tubing for example.

Measuring center to top is not the wrong way, it is simply a different way. Where it become an issue is when frames are bought and sold. A seller lists it measured center to top, and the buyer assumes it is center to center, or vice versa. The buyer ends up with a frame the wrong size.

All frames I built were measured center to top and stamped that way under the bottom bracket. If you are buying one of my frames, and the seller doesn’t clearly state what size is stamped on the frame, ask. The center to center measurement is simply 2 cm. less than what is stamped. For example, a frame stamped 56 cm. will measure 54 center to center.  


     To Share click "Share Article" below.    

Monday
Nov272017

Brass vs. Silver

Joining metal by brazing became the method of choice when the bicycle was invented in the late 1800s. Early bicycle lugs were in fact pipe fittings, but greater strength was needed, so brass was used instead of lead base solder.

Soldering and brazing are pretty much the same process, flux is required to allow the solder or brazing material to flow. The difference is the melting temperature of the different materials.

Soldering takes place at 427 degrees centigrade and below. Brazing between 593 and 895 degrees centigrade. Different sources will give a slightly different range, but as silver and brass will both melt within the range for brazing, that is the correct term. Brass brazing or silver brazing,

Silver is often known as Silver Solder, but strictly speaking it is not soldering because the melting temperature is above 427 degrees. Silver brazing rods come in soft, medium and hard, the soft being at the low end of the temperature range, progressing to a higher melting point for the medium and hard.

Silver is more expensive as it is for the most part silver, alloyed with other materials such as cadmium, or nickel. The price of silver brazing rods, will fluctuate with the price of silver on the Precious Metals Market.

Brass is already an alloy of copper and zinc, other materials will be added to give desired characteristics, like flow properties and workability. Brass melts at the higher end of the brazing range.

Often silver brazing is quoted as being best for lightweight bicycle frames because it melts at lower temperature. However, in the hands of a novice it is just as easy to overheat a joint using either silver or brass. In fact if you overheat a joint using silver, the silver will no longer flow, and the joint will have to be torn apart, thoroughly cleaned and start all over again.

Most framebuilders become proficient in either silver or brass, but my guess is, only a few totally master both. I became proficient with brass, but never built a complete frame using silver. The only time I used silver, was for brazing water bottle bosses, and top tube cable guides. The reason: Using the higher temperature brass would put a slight ripple in the thin un-butted part of the tube that would show after painting.

The traditional front and rear drop-outs, (Campagnolo for example. (picture left.)

The type where the front fork blade, chainstay and seatstay are slotted to take the drop out, have to be brass brazed.

Silver will not fill in the gaps, or fill the hole in the end of the tube. So even a builder who uses silver for the main frame will use brass for this type of drop-out.

Silver requires closer tolerances for example where the tubes fit in the lug. My method of altering the angle of the lug with a small hammer as I brazed, could not have been done with silver. The steel lug had to be at a bright red heat in order to be malleable enough to reshape. This would be too hot for silver.

Brass historically has always been used in Europe, which of course includes the UK where I learned to braze using brass. As a framebuilder becomes proficient at brass brazing, he learns to braze a joint cleanly, and not spill globs of brass over the edges of the lug. If this happens the builder will spend hour’s hand filing the excess brass away. Possibly leaving behind ugly file marks.

Silver on the other hand is softer and the excess can be sand-blasted away, or even scraped away with a small penknife. The fine and intricate, sharp edge lug work carried out by the late Brian Baylis, could not have been achieved using brass. English builder Hetchins did some fine elaborate brass brazed lug work, but on close inspection the corners and edges are not as fine and sharp as one can achieve with silver. (Baylis below left. Hetchins below right.) 

Silver brazing bicycle frames on the scale it is used today is an American development that can be traced all the way back to the Schwinn Paramount. Read the history here. One of the reasons the Schwinn Paramount was built using silver, was the easy clean up.

The intricate Nervex lugs used (Right.) would have been a pain to brass braze cleanly.

Many of the early American builders were influenced by the Schwinn Paramount, and a few even apprenticed there.

Brass or Silver? Both have their own advantages and disadvantages. Both require different skill-sets.

I could never have done what Brian Baylis did, and on the other hand, he could not have built the number of frames I built using the methods he did.

Brass is more suited to production, silver is more suited to the artisan builder, custom building frames one at a time.

In my opinion, brass in many ways is more forgiving from a workability standpoint. For an absolute beginner, don’t be misled into thinking silver is easier.

Try brass brazing a few pieces of scrap metal together. You will have a lot of fun for not too much money. And a lot less heartache, than spending a ton of money by plunging straight in, and trying to silver braze a frame with little or no experience.


     To Share click "Share Article" below.

Monday
Nov202017

Brass Brazing Reynolds 753

When I had my frame business in Worcester, England I was only about 25 miles from the Reynolds tube factory in Birmingham. Over the years I developed a close working relationship with Reynolds.

In time I got to know the engineers and management at the factory, and we exchanged various frame design and material input. I knew about Reynolds 753 long before its introduction in 1975 and always made it clear if I couldn’t brass braze it I wasn’t interested.

Traditional brazing by European framebuilders was done with a large soft oxyacetylene flame that heated the lug and several inches of the tube uniformly which allowed the brass to flow through the joint with a minimum of distortion. This was a hangover from the days when frames were hearth brazed in a forge filled with hot coals.

I had developed my own method of brazing with a smaller much hotter flame, working quickly, and heating the tube no more than a quarter of an inch from the lug. I asked the Reynolds engineers if I could submit a test sample brass brazed in this manner to compare with a silver brazed sample.

The way Reynolds tested these samples was to measure the hardness of the 753 tubing a certain distance from the lug to see how much hardness had been lost or retained. My sample did not officially pass but they were sufficiently impressed to ask if I would build six brass brazed 753 frames to be ridden and tested by the Raleigh Team in the 1976 Tour de France.

The Reynolds Company was a part of the TI (Tube Investments.) Group of companies that included Raleigh and Carlton. When I delivered the finished but unpainted frames to the Raleigh Experimental Facility in Derbyshire where the Raleigh Team bikes were built I felt a slight animosity. Possibly because they felt 753 was their baby and I was an outsider.

However my arrangement was with Reynolds not Raleigh and the frames I built were ridden in the Tour along with the Derbyshire built frames. I never knew who rode what in the Tour but I was told that all the frames performed equally well. The result of this was I was told unofficially that I could brass braze 753 but I was asked not to advertise the fact or tell others.

My working relationship with Reynolds continued when I came to the US in 1979. They invested a considerable amount of money in providing special aerodynamic tubing for the American Team Time Trial bikes. I built these at Vic and Mike Fraysee’s shop in New Jersey with the help of Mike Melton.

When I went to work for Masi in late 1980 it was required that I take the 753 test and I did submit a silver brazed sample which passed. I never built any 753 Masi frames but over the years I did build many custom ‘dave moulton’ and Fuso frames in the material. All brass brazed.

What about my promise to Reynolds not to tell? I have been retired from framebuilding since 1993, and so too are all the management and engineers I worked with at Reynolds. 753 is no longer produced, and it is not a secret that will affect National Security.

The agreement was a verbal one, sealed with a handshake. A kind of “We won’t tell if you don’t.” Over the years I never lied to a customer if they asked me outright. I told them it was brass brazed as was every other frame I built. If they didn’t ask, I didn’t offer that information.

To coin an old phrase, “The proof of the pudding is in the eating.” There are many 753 frames I built still out there, between 25 and 40 years old, and I have not heard of any that have failed. Any super light frame is not going to last forever, so 40 years or more is a good lifespan.

Reynolds 753 was one of the best frame materials ever produced in my opinion. I always felt that properly done brass brazing annealed the tubing at the joint just enough to take out some of the harsh riding characteristics. And remember I was only annealing the tube a very short distance from the lug and this is the stronger butted portion of the tube.


     To Share click "Share Article" below.