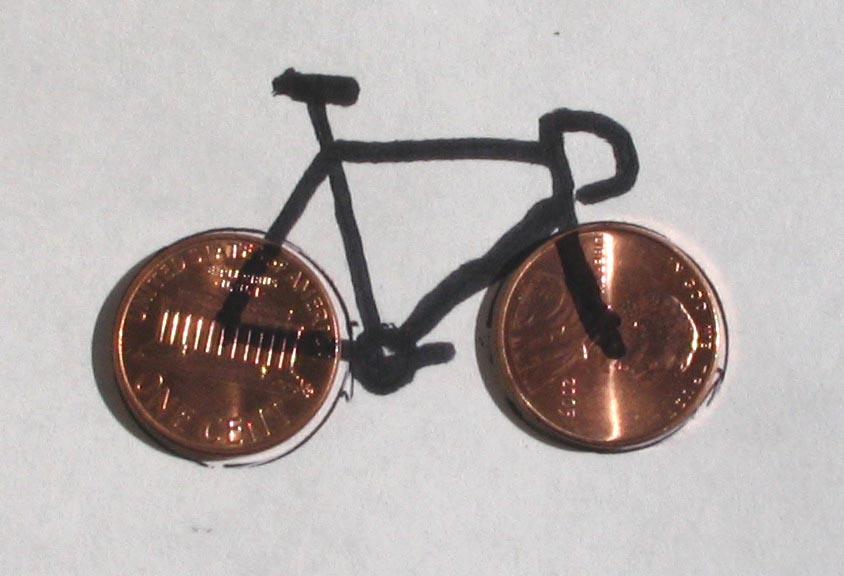
Dave Moulton

Dave's Bike Blog

Award Winning Site

More pictures of my past work can be viewed in the Photo Gallery on the Owner's Registry. A link is in the navigation bar at the top

Bicycle Accident Lawyer


Powered by Squarespace
Search Dave's Bike Blog


 Watch Dave's hilarious Ass Song Video.

Or click here to go direct to YouTube.


A small donation or a purchase from the online store, (See above.) will help towards the upkeep of my blog and registry. No donation is too small.

Thank you.

Join the Registry

If you own a frame or bike built by Dave Moulton, email details to list it on the registry website at www.davemoultonregistry.com

Email (Contact Dave.)

 If you ask me a question in the comments section of old outdated article, you may not get an answer. Unless the article is current I may not even see it. Email me instead. Thanks Dave

Entries in Bicycle Design (46)

Friday
Aug182006

Shimmy Re-Visited


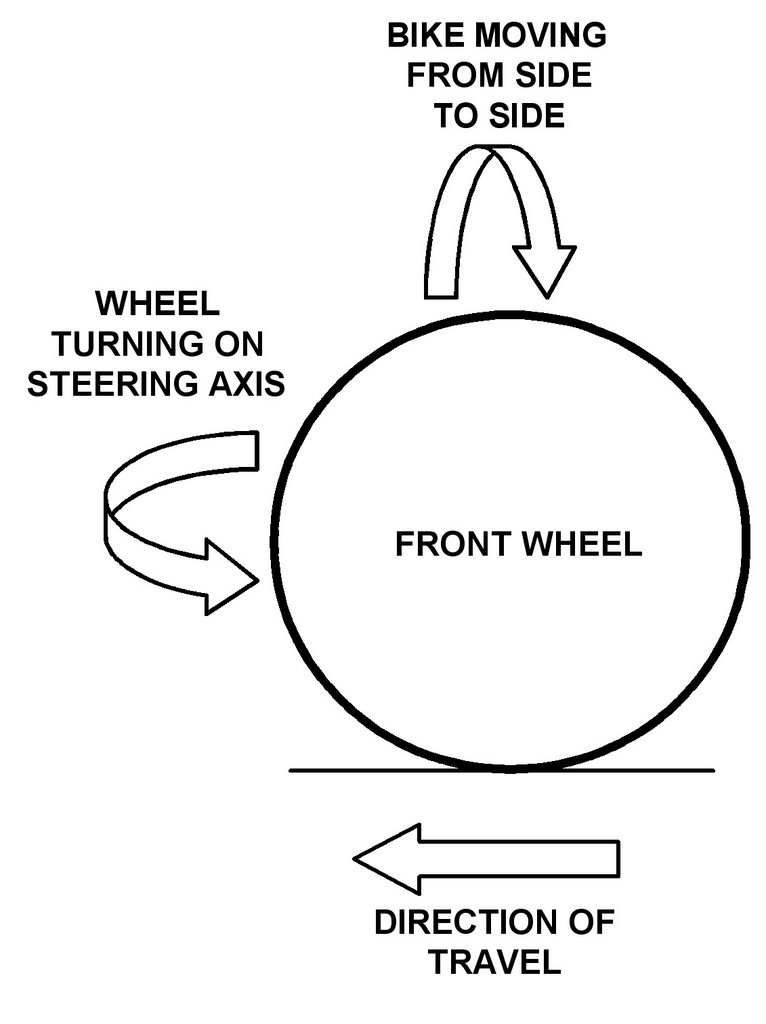
Speed wobbles or shimmy occur on bicycles and motorcycles because the front wheel is free to turn about its steering axis and at the same time the whole bike can move from side to side along a horizontal axis with the pivot point being the front and rear wheels being in contact with the road. Think of the motion of climbing a hill out of the saddle and you are swaying the bike from side to side.

So if the bike is swaying from side to side and the front wheel is turning from left to right at the same time the front wheel is in Nutation. Rotation is an object spinning around a fixed axis; Nutation means the axis (or axel in the case of a wheel) is also moving as the object is spinning. Think of an orbiting planet; the Earth spins but its axis also moves as it orbits the Sun

To demonstrate to motion of a front wheel in a shimmy hold a bicycle wheel by the axel in your outstretched hands (not spinning) and move your hands in the motion of pedaling a miniature bike. If the wheel was spinning while you were doing this the wheel would be in nutation. If you spin the wheel you will notice that the axel is difficult to move because the gyroscopic action of the spinning wheel is preventing nutation.

Now get someone to tap the side of the wheel as it is spinning; it will nutate (wobble) briefly but quickly return to spinning straight as the gyroscopic action dampens the nutation. So nutation is a constant and natural occurrence as a bicycle is being ridden caused by the movement of the rider pedaling the bike, side winds, bumps in the road, etc.

We do not normally notice this because the nutation is constantly dampened out, by gyroscopic action; the bike’s trail which provides a caster action keeping the front wheel straight, and the damping effect of the rider’s hands on the handlebars. However at a critical bike speed, the front wheel nutation frequency matches the bike + rider natural frequency amplifying or sustaining the nutation. And you have shimmy.

During a high speed shimmy the front wheel is not just fluttering back and forth about its steering axis but is also moving side to side in the horizontal plane shaking the head tube violently from side to side; the rider’s weight on the saddle provides an anchor point, the rear wheel on the road provides another making a pivot point for the front end of the bike to move from. Adding a pannier or saddle bag behind this pivot point will increase the likelihood of shimmy and cause the bike to shimmy at lower speeds because it gives an added sling-shot effect, especially if the load is loose and free to move.

It is a well know fact that tall riders on large frames are more likely to experience shimmy. I believe this is because the seat tube slopes backward and as the frame gets taller and the rider’s weight is more directly over the center of the rear wheel. This provides a near vertical pivot line between the riders mass on the saddle and the rear wheel on the road for the bike to shake and weave. With a smaller frame the rider’s weight is more forward with a less than vertical pivot line, making it less prone to shimmy.

Pressing your knee against the top tube will often stop a shimmy; in doing so you have dampened the shaking top tube through the muscles and tissues in you leg without actually connecting the leg to the top tube. This is also a clue that the rider needs to be holding the handlebars lightly so that you are damping the nutation rather than being connected to it by grasping the handlebars tightly.

In extreme cases if the rider is gripping the handlebars tightly the body starts to shake along with the head tube and handlebars. It becomes difficult to loosen your grip on the bars with your body shaking violently and because the shaking mass now includes your body it is much larger, higher and more fluid making the situation much worse and a crash may ensue.

This is more likely to happen with motorcycles and it has often been observed that a rider will be thrown from the bike, the bike will then stop shaking (because there is no longer a rider in harmony with the machine’s vibrations) and the bike with continue on for a while on its own before it hits something or looses momentum and falls.

An article on Wikipedia stated that frame flex has nothing to do with shimmy, but I am not so sure. Frame flex may not be the cause of shimmy but I believe it can sustain it. If the seat is not moving because the rider’s mass provides an anchor. And the rear wheel is not moving sideways at its point of contact with the road; but at the same time the head tube is shaking side to side, something has to be flexing and twisting, either the frame or the rear wheel.

Frames I built do not shimmy as a rule; so what did I do different? My bikes had a little more trail so possibly the damping effect of the extra trail helped. But I believe another factor is that all my California built frames had Columbus SP (heavier gauge) chainstays, making the rear triangle much stiffer and less likely to flex.

There could possibly be flex in the rear wheel if you consider that the upper spokes are under tension and the lower spokes are not; making the wheel likely to flex at the bottom. Also a dished wheel has unequal tension on the drive and non-drive sides. So if you have a bike that is prone to shimmy maybe think about switching to a stronger more tightly built wheels.

Most high speed shimmies occur while coasting down hill so here are a few things you can do to avoid this phenomenon. Lifting your weight from the saddle without actually standing up will transfer your weight to the pedals which are a much lower and more forward point of contact. Keep one pedal down and most of your weight on that pedal; you can switch pedals as you corner keeping the lower pedal on the outside. This will make the point of contact between you and the bike very low, but also off center of the frame.

Keep your knee lightly against the top tube as I have already mentioned, and hold the bars lightly. Many riders report that a shimmy it gets worse when applying the brakes. Well of course when you squeeze the brakes you automatically grip the handlebars tighter. So practice applying the brakes while loosely holding the bars.

Try switching your hands to the brake hoods and applying the brakes over the top with your fingers. It may take some nerve to do this if your bike is already shaking, but letting go of the bars for a split second may bring you out of the shimmy. Remember it is the connection between you and the bike that is causing the shimmy and the more connected you are the worse it will get.

Friday
Jun302006

Squirrelly

The word sometimes used to describe a rider’s style but more often it is used to describe the way a bike feels or handles.

Typically a bicycle that is “squirrelly” has a steep head angle and will deviate from a straight line at the slightest movement. Some people like the lively feel of a bike like this and I often hear quotes like, “People who call a bike squirrelly don’t know how to ride a bike.”

Agreed if you put a novice on such a bike he is a danger to himself and others; put an expert on the same bike and he can ride it safely. However take the same novice and put him in a bike that handles well and is easy to ride and he rides safely, and the expert on the same bike becomes a brilliant bike handler.

Why build a bike with a steep head angle anyway? Track bikes designed to be ridden on a banked velodrome have steeper head angles, because it is necessary to be able to change direction quickly to dart around an opponent, but the banked track has the effect of the rider traveling in a continuous straight line. At speed the rider is still theoretically 90 degrees to the track surface, and actually centrifugal force is pushing him down on the surface making it harder to deviate from a straight line. Hence the steep head angle to compensate.

Steep head angles on road bikes were in vogue in the mid 1970s and some builders carried it on into the 1980s. I never followed this trend and for a while was I was out of step with most other builders. Let me take you back to look at the history of bicycle design and to explain why this happened. In the 1940s an 1950s when I started riding the standard road geometry was a 71 seat angle, with a 73 head angle. The shallow 71 seat angle can be traced all the way back fifty years earlier to the Ordinary or Penny Farthing.

Early “Safety” or conventional design bikes as we think of them today also had shallow head angles, but by the 1940s it had been established that 73 degrees was the ideal head angle. I happen to believe that is still true today; however bikes of the 40s and 50s had 3 inches or more of fork rake. There was a theory back then that the steering axis, a line drawn through the head tube, reached the ground at the point where the wheel contacted the ground.

In other words there was zero trail; the theory was if you had trail the steering would be sluggish and heavy. The 71/73 angle design made it convenient for framebuilders to make frames in various sizes. With the head and seat angle going away from each other as the frame got bigger (Taller) so did the top tube become longer. The heavy steel cast lugs used back then gave little scope to build frames with different angles.

Moving on to the 1960s there was a huge slump in bicycle sales world-wide as economies boomed and in many places working class people were buying cars for the first time. The cost of a frame hardly rose from the late 1950s to the early 1970s even though earnings and the price of everything else had.

Framebuilders had to look for ways to cut corners and build frames in less time. No braze-ons was one cut back; and another was the parallel angle frame. First 72 degrees parallel because riders were not ready to jump from 71 to 73, but in a short time 73 seat and 73 head became the norm.

Framebuilders were using jigs for the first time for speedy assembly and the parallel design made it possible to make a simple fixed jig. Tubes were pre-mitered all the same length and to build various sizes of frames they simply raised or lowered the top tube. You could have any length top tube as long as it was 22 1/2 inches. Rather like Henry Ford; any color as long as it’s black.

By this time the fork rake had become a little shorter, and to have trail was considered okay, overall wheelbases had also shortened and everyone realized that these bikes were a lot livelier than the bikes of the 1950s. By the 1970s the framebuilder’s lot had improved with frame prices starting to catch up with the rest of the economy; helped along by a bike boom starting in America.

Remember back in the 1950s with the seat angle 2 degrees shallower than the head angle and how it made it convenient to build various size frames with varying top tube lengths. Nobody wanted to go back to 71 seat angles so frames began to appear with 73 seat and 75 head angle. Riders also discovered that these steeper head bikes felt livelier, especially when you got out of the saddle to sprint or climb.

About this time I was doing my own experimenting with frame design and I realized that it was not the steeper head angle that gave the bike its lively feel, but in making the head steeper they had moved the front wheel back directly under the handlebars. When a rider gets out of the saddle to sprint or, climb the bike is going to sway from side to side whether intentionally or unintentionally.

With the handlebars directly over the point where the front wheel contacts the road the bike can swing from side to side keeping in the front wheel in the same straight ahead plane. I had remembered back in the 1950s with those long fork rakes and short handlebar stems; the bars were way back behind the wheel’s point of contact. When you got out of the saddle the bike felt sluggish and heavy. I named it “The wheelbarrow effect.”

As the bike swayed from side to side the front wheel was turning to the left and right, but the gyroscopic action of the spinning wheel was trying to keep the bike straight; you had two forces fighting each other. To demonstrate this to yourself place the end of a straight edge on the ground and hold it 90 degrees to the ground. Swing the top of the straight edge side to side and you will see it moves in the same plane. Now hold the straight edge at an angle to the ground and move from side to side; you will see the top end where your hand is swings in an arch. If this were your bike you would be turning the front wheel as you swayed.

I never liked the twitchiness of the steeper head so I stuck with the 73 degree head angle and to get the handlebars over the front wheel I did two things. I shortened the fork rake; this actually gave my bikes a little more trail than average and made the bike very stable and gave it certain self steering qualities. The other thing I did was shorten the top tube and use a longer stem. The result was a bike that felt just as lively but without the inherent twitchiness. A rider’s weight is mostly in his shoulders and upper body so by pushing the rider forward as I did I moved the mass forward greatly improving the bike’s handling especially when cornering and descending at speed.

Most frames built today have a head angles around 73 degrees; a degree either way is no big deal. It is when a head angle gets to be 75, 76 or steeper would I consider it steep. So to sum up; what makes a bike squirrelly? A steeper head angle has less resistance to turning, so any slight movement of the bike will cause it to deviate from a straight line. Also steeper head angle means less trail which is the castor action that helps to keep a bike tracking straight.

Friday
Mar102006

History Lesson


1968 Pugliaghi. Everything clamp on even the bottom bracket gear cable guides. Pictures from TheRacingBicycle.com

In the late 1950s through the early 1970s there was a slump in bicycle sales in Europe. In the 1960s the economy was booming and although in many places the bicycle had always been the mode of transport for the working classes; many were now buying cars for the first time. At the same time the fitness craze had not yet begun; that started in the 1970s.

Racing bicycles and framebuilders were also hit by this slump and the price of a frame rose very little in that decade even though inflation did. Framebuilders had to look for ways to cut costs and one of them was to leave off all braze-ons. Building a frame without braze-ons does save a considerable amount of time and therefore labor costs. The only braze-ons seen in this era was a chainstay stop and sometimes a little stop under the down tube to prevent the gear lever clamp from sliding down the tube.

Having done that framebuilders could not tell their customers they were doing this to cut costs, hence the story that braze-ons weaken the frame. I think Cinelli started it; framebuilding was never their main source of income (Handlebar stems was.) so the price of a Cinelli frame was always high. So everyone’s thinking was if Cinelli can get away with it so can we, and they followed suit.

Do braze-ons weaken the frame? Maybe very marginally but then so does brazing the lugged joints; it is part of the framebuilding process. I have seen down tubes break right at the clamp on gear lever. Clamps require more maintenance they collect moisture under them and if they are over tightened they can dig into the tube and start a stress riser. But I feel if anyone is restoring a bike from this era they should keep the cable clamps they are authentic for the period.


Monday
Feb272006

A Different Thought on Frame Sizing


After measuring and studying hundreds if not thousands of customer’s measurements over the years as a custom frame builder. I came to the conclusion that although human bodies are all different; they do follow certain rules of nature.

Choosing frame size on inseam alone does not work across the board because for example it is common for a 6 foot man to have an inseam as short as 30 inches; and you can’t put a 6 foot man on a 51 cm. frame which is what his inseam suggests.

Tall people are not scaled up models of short people. Most of the height difference is in the legs; body length differs by a lesser proportion. If you have long legs then you also have long arms. Short legs; short arms. This makes sense since most animals are four legged; why should we be any different?

Leg length is a combination of the inside leg measurement plus the length of the foot. Length of the foot is important because when pedaling the toe is pointed downward at the bottom of the pedal stroke; so the foot becomes an extension of the leg.

People, who have a short inside leg measurement for their height, generally have longer feet. (Bigger shoe size.) It is as if they were designed as a much taller person, but their heel got turned further up their leg; making a short leg, long foot.

Imagine two people both six feet tall standing side by side; one has a 34 inch inside leg, the other a 32 inch leg measurement. Because they are the same height it follows the one with the shorter leg has a body 2 inches longer; he also has longer feet and shorter arms than the other guy. They can both fit on the same size frame, (59 cm. center to top i.e. 57 center to center.)

They will both have close to the same seat height, because the short leg guy has a longer foot so his seat needs to go higher than his inseam would suggest. They can also use the same top tube length and handlebar stem, because one has short body long arms; the other long body, short arms; making their reach the same. Minor adjustments in seat height and stem length may be called for.

It has occurred to me that with these compact frames on the market now and only available in small, medium, and large; customers are only ball parking frame size anyway. It has long been my opinion that frame size is linked to the overall height of the rider more than any other measurement because of the rules of nature I have just spoken of.

I have formulated this based on my own frame sizing chart. If you are 5’ 3” to 5’ 5” frame size equals Height divide by 3.3. For people 5’ 6” to 5’ 10” frame size = Height divide by 3.2 and if you are 5’ 11” to 6’ 4” frame size = Height divide by 3.1

A example would be someone 6’ 2” = 74” divide this by 3.1 = 23.87 in. (61 cm. measured center to top. i.e. 59cm. center to center. A person 5’ 7” = 67” divide this by 3.2 = 20.93 in. (53cm. center to top. i.e. 51cm. center to center.) The easiest way to convert from inches to centimeters is to get a tape measure with both metric and inches on and simply read across. If you don’t have a tape measure the formula is “inches x 2.54”

Reach which is top tube plus stem length; is frame size center to top plus 10cm. If you want something more accurate go to the chart on my website The chart was derived not by any mathematical formula but by records of custom frames built over many years. Most people find it pretty accurate. What I have put forward here in this Blog is an attempt to come up with a simple formula that comes close to this. If you are an experienced rider don’t change your position based on this alone because this is new thinking. It is intended as a place to start for a newcomer to the sport.

Feedback would be apprecated.

Friday
Dec232005

The Mechanics of Steering.


(Or is it the Physics of Steering?)

Roll a wheel or for that matter any round flat object even something as small as a coin on a flat surface and it will roll in a circle. It will continue rolling in ever decreasing circles until it finally falls and settles in one spot. This is a demonstration of the law of gyroscopics. That a spinning wheel will remain upright as long as it keeps spinning.

Most people know that this is what keeps a bicycle upright while in motion and if you stop you fall over as all cyclists do at least once in their lifetime. Also a spinning wheel (Or rolling coin.) as it looses momentum and starts to fall it will turn in the direction it is falling, which is why it rolls in a circle.

This law of physics gives a bicycle a simple built-in self steering capability. You can demonstrate this to yourself by holding a wheel in both hands by the spindle and spinning it. The first thing you will notice is that the wheel wants to stay upright in the same plane, demonstrating the first law mentioned in the opening paragraph.

If you forcibly move the top of the wheel to the left or right as it is spinning it will also turn in the direction you are leaning it. Just as a rolling coin will turn in the direction it is falling. So as you lean a bicycle into a corner it will steer itself around the corner. Let’s not forget the rear wheel. Although it is in a fixed position within the frame and cannot turn, it is still spinning and leaning therefore assisting in steering the bike around the corner.

This also explains the importance of a frame being straight with both wheels in the exact same plane. If a frame is twisted one wheel is always leaning and therefore always steering the bike in that direction. In normal riding conditions you may not even notice this as you will automatically and subconsciously correct this by steering in the opposite direction. But try riding hands off and the bike will pull to the left or right. Make sure you are on a level surface as a camber in the road will also cause you to move in that direction.

There are some who argue if it is the gyroscopic motion of a spinning wheel that keeps a bicycle upright, how come it is possible to ride at a slow walking pace? The answer is that it is not all gyroscopics, it is balance. The law in balancing anything is that the center of gravity of the object be directly over the point of contact with whatever the object is balancing on. In theory it should be possible to balance a golf ball on a pin head.

Someone walking on a high wire, as they start to fall to the left will shift their body, therefore their center of gravity to the right. Balancing a broom on your hand is a relatively easy trick because you simply move your hand in the direction the broom starts to fall keeping your hand directly under the broom’s center of gravity.

Have you noticed also that it is easier to balance a broom on your hand with the head of the broom up, than it is to balance a lightweight stick on your hand? The center of gravity of the lightweight stick is somewhere in its center, whereas the upturned broom has a center of gravity near the top where the head is.

A bicycle and rider has a high center of gravity; the bike can be twenty pounds or less while the rider is a hundred pounds or more. Center of gravity is somewhere in the middle of the rider, three feet or more from the ground. And just like the high center of gravity of the upturned broom, this works in favor of the bicycle and rider when it comes to balancing.

When riding very slowly, as the bike and rider fall to the left the bike turns to the left. The rider corrects this by steering to the right, then back again as the rider starts to fall in the opposite direction.  What the rider is doing is moving the bike from left to right under them just like moving your hand under the upturned broom. And just like the simple broom balancing trick there is no conscious thought process to this, it is automatic.