


Headset Removal and Replacement
The great thing about vintage steel bikes is that you can work on them yourself with a few simple tools. Here is a job I will walk you through, namely the removal and replacement of the headset cups and bearings. I will explain how you can do this with a few simple items picked up at your local hardware store.
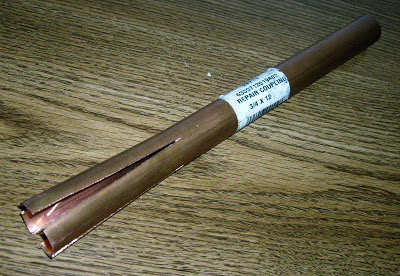
To remove the bearing cups from the frame I purchased a piece of copper tube. I found a ¾ inch repair coupling that was ¾ inch diameter inside and slightly under and inch outside. These come in various lengths; 12 inch long worked fine for my needs and the ends were already machined nice and square.
All I had to do was cut four slots down the length of the tube about 4 inches long, using a hacksaw, and bend the four pieces outwards as shown in the picture above. These squeeze in to insert through the headset cup and then spring out again inside the head tube. With a hammer or mallet, the cups can be safely knocked out of the frame.
This worked in exactly the same way as the professional Campagnolo tool that costs a great deal more. To remove the lower ring from the fork, I turned the fork upside down resting the threaded end on a wooden block, and drove the ring off with a hammer and flat punch.
It is necessary to tap first one side of the ring, then the other to get it to come off straight. The bottom ring was hardened steel so the flat punch did not damage it in any way.
To press the cups back into the frame I bought a 5/8 dia. nut, bolt, and several large flat washers. I pressed the top cup in first, which again was hardened steel, with the bolt facing up and the nut on top. Tightening the nut on the bolt squeezed the cup into the frame.
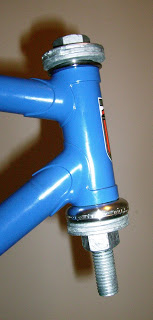 Then I removed the nut and bolt, reversed it and pressed the lower cup in. (See picture, left.) The bottom cup was light alloy so I placed the lower steel fork ring inside, upside down.
This brought it flush with the outside edges of the cup so the washers were pressing on the inner hardened steel bearing surfaces, rather than the soft alloy outer edge of the cup.
Don’t press the cups in with the ball bearings in place, or you may damage the balls or the bearing surfaces.
Finally, to drive the lower ring on to the fork. I found a short piece of one inch black iron pipe. This was slightly bigger than an inch inside so it slid easily over the steering column.
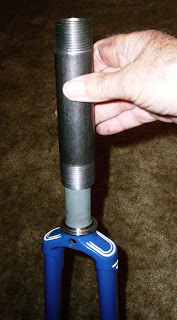 Holding the fork in one hand, I drove the bearing ring onto the crown race, using the piece of iron pipe as a sliding hammer. (See picture, right.)
Once again, because the lower ring is hardened steel the iron pipe did no damage.
The piece of iron pipe does not have to be threaded as shown here. It just happened to come that way, in the length and weight I needed to do the job.
Finally, use plenty of grease in the inside of the head tube. It will help the cups slide in and prevents corrosion in the future.
 Dave Moulton
Reader Comments (2)
In my earliest days as a bike mechanic, I fabricated a head cup installation tool from a heavy bolt and suitable washers. Over time it attracted a variety of extra parts that were found suitable for different headsets and a selection of different length bolts so I didn't have to run the nut down so far when working on shorter head tubes. Eventually I bought a set of VAR headset tools, as that's what I could afford, and then splurged for the Campy tools. Finally, I bought a complete Campy toolkit, giving me an extra set that I reserved for only the fanciest jobs. In spite of the fact that I now have three sets of professional tools, plus some miscellaneous Bicycle Research stuff, I confess that I most often reach for the original bolt and washers out of the third drawer up in my toolbox, just because it's handy and works just fine for the vast majority of jobs.
Headset removal should be performed with the bike repair stand clamped to the bike's seatpost and definitely not to a frame tube, since you'll be hitting the removal tool quite hard with a hammer.