


Vintage brake cable routing
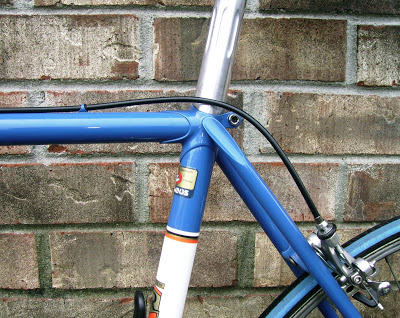
If you own a vintage steel frame, chances are the rear brake cable is routed through braze-on cable guides along the top tube.
Every time the rear brake is applied the cable housing moves slightly. If it drags across the top tube, or touches the seat-stay caps, eventually it will wear through the paint.
To avoid this, route the cable so it is slightly above the seat lug, clear of the paint, and the cable housing rests against the aluminum seat post, as shown in the top picture.
Try not to have too big of a loop in the cable housing, or it will push the side pull brake off center.
To hold the cable housing in this position, place a small rubber “O” ring just behind the last cable guide.
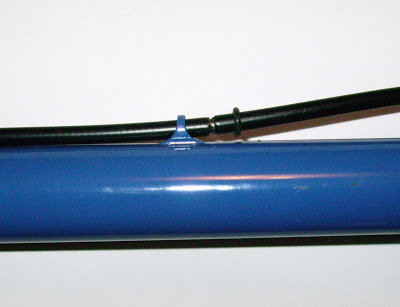
Cut a groove in the plastic sheathing of the cable housing, with a sharp knife, so the “O” ring will drop in this groove and stay in place. See the close up detail shot above.
Use a # 60 “O” ring (¼” O.D. x 1/8” I.D.) These can be found in the plumbing section of your local hardware store. It's a good idea to buy a few spare to add to your tool-box, as they are inexpensive. The rubber deteriates in the sunlight, and they need replacing from time to time.

 To Share click "Share Article" below
 Dave Moulton
Reader Comments (6)
Thanks Dave.
I've been using a small bit of electrical tape rolled around the cable.
I am curious why these were the norm for so long instead of cable stops. These were in use at the time for rear derailleurs, so its not as though no one had thought of it. It seems like they caught on on road bikes after mountain bikes (which seem to have always used them) caught on, which seems a bit ironic given that mountain bikes would benefit most from a fully sealed cable run. Were braze-on cable stops simply not trusted for the forces of braking?
Back in the day, they were clamp on. The housing didn't slide much then.
Peter,
Braze on cable stops were the norm in the 1950s, then Cinelli said that braze-ons weakened the frame, and produced a frame that cost a lot of money and was completely without any braze-ons. Everyone followed suit because leaving braze-ons off a frame saves a tremendous amount of time.
Through the 1960s everything was clamp-on, until the mid 1970s when people began to realize braze-ons were neater, and they slowly returned. The three cable guides down the center of the top tube mimicked the three clamps that went before, but as Bill K pointed out, they never held the cable like the clamps before them.
Dave
The photo shows cable guides, which replaced the clamps used before. If I understand correctly, that is different from stops, which leave a section of cable exposed. In theory, stops might reduce sponginess due to housing compression, by shortening the housing, but it also introduces potential slop at the stops, if the end of the housing is not well-seated against the stop (with a ferrule?). It would seem that stops leave more opportunity for crud to enter the cable, and they are more work to set up, since there are two more cuts to make in the housing. I can't say I'd choose a frame based on this, which would be a bit like choosing a house based on the doorknob. But I am curious what you think of the merits of stops vs guides.
In the 50's, 60's, and 70's (and even the early 80's) the type of steel used forced the builders to silver solder "braze ons" because applying the high temps needed to braze a part on could cause the thin parts to crack after metal fatigue sets in. Cracks by the shifter bosses and near the bottom were common.
Silver soldering parts took longer than brazing, so builders started using clamp on parts.