Framebuilding FAQs
 Thu, February 14, 2008
  I received two emails last week with questions on framebuilding. I don't have the time to go into lengthy instructions on how to build a frame, however, I thought I would post my answers here, that way others might find it useful.
I am hoping other readers will find it interesting to know some of the aspects of putting a frame together.
One question was, "Where do I start, do I need to build a jig?" A jig is simply a fixture to hold the tubes in place during assembly, it speeds production if you are building a number of frames all the same.
The frame is not brazed in a jig, for several reasons. The jig would suck up all the heat and take it away from the area you are trying to braze. The jig would obstruct access to all parts of the joint. Metal expands as it is heated and contracts as it cools, if the tubes are firmly clamped in a jig all manner of distortion will take place, and misalignment and built in stresses will be the end result.
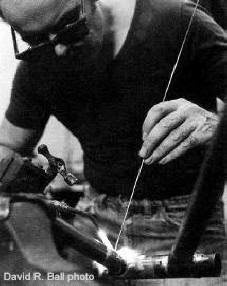
The picture that permanently heads this blog is of me tack brazing a frame in a jig. I am heating and brazing tiny spots, just enough to hold the tubes in place. Then the frame is removed from the jig, checked for alignment and held in a vise, with a wooden block around a tube to prevent damage. As the frame is fully brazed the tubes are free to expand and contract as they will.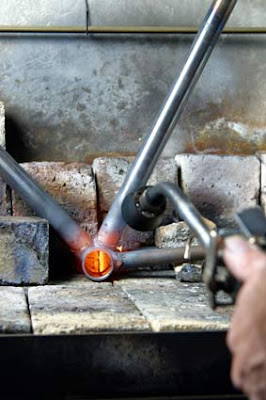 Jigs only came into wide use in the 1960s, prior to that most framebuilders assembled and pinned the frame together by drilling a small hole through the lug and tube, and inserting a short piece of wire or small nail. The frame was then usually hearth brazed; that is a hearth of hot coals, or one made of fire bricks with the heat applied with a hand held torch. (Picture left.)
With hearth brazing there is less distortion because the whole joint is heated uniformly. For example, the whole bottom bracket shell, seat and down tubes, and in some cases, the chainstays are all brazed at the same time.
The drawback with hearth brazing is that you heat the tubes several inches away from the joint and thereby anneal or soften the tubes. The method I used was to braze with a hand held torch that had a smaller but more intense flame. Working quickly, I could pin-point the heat on the lug only heating the tube barely a quarter of an inch (6mm.) from the lug. This way the tubes retained more of their inbuilt strength, resulting in a stiffer more responsive frame.
On the downside this method causes more distortion. However, by always following the same procedure and sequence, I got to know which way the frame would distort. I would start off with the frame out of alignment, so it would end up in alignment after it was brazed.
When the lug and tube are initially heated they are two separate pieces of metal so not much distortion takes place because the two can move independent of each other. Once you flow brass into the joint the two become one. As the metal cools it contracts and the metal shortens in length so it will pull in that direction. If I begin brazing at the back or center of the lug; there is little or no tube movement at this point because the whole is a triangle holding itself in place.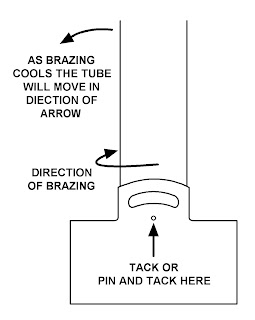 Then moving clockwise to the left, as the left side cools it will pull to the left; it is still moving to the left as I work my way around to the right. It will move a considerable amount because the right side is not yet brazed and the tube is free to move. By the time I get to the right side and joint is finished; as it cools it will pull back slightly to the right, but not as much because the left side has already cooled and is solid.
So you can see that the tube needs to be slightly offset to the right to compensate. I cannot tell you by how much because it depends on the speed of the operator and the amount of heat used.
As for brazing the rear triangle. I would finish and clean up the main triangle, then assemble the rear triangle separately, by brazing rear dropouts into chainstays, and next the seatstays to the rear dropouts. Then cut to length and braze the top caps to the seatstays. After clean up, I would then braze the rear triangle to the main triangle.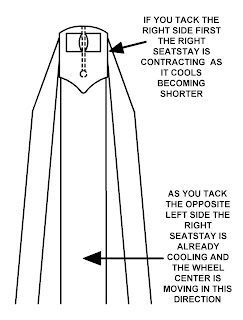 The same alignment problems exist for the rear triangle. If I tack braze the right side first, it is already contracting as it cools and the wheel center is moving to the left. (Viewed from the rear.) Now when I braze the opposite left side one would suppose that it would then contract as it cools and the wheel center back to center, but this is not the case. Because when I tack braze the right side, the left side is preheated so brazing the second side takes less time, and the left side contracts at a lesser rate.
Again the wheel center has to be set slightly to the right to compensate. When the initial tack has been made and allowed to cool; if the wheel center is off, the tack can be reheated to a dull red. This is not enough to melt the tack, but the brass becomes plastic at this temperature and can be moved in the desired direction to bring it into alignment. Bearing in mind that it will again contract on cooling so it is again necessary to over compensate. Once alignment is correct the seatstay caps can be fully brazed to the seat lug and the rear triangle will stay aligned because each side will expand and contract back to its original position.
I did not pin my frames, I assembled and tacked them in the jig and my brazing method did not allow the tube to move, because part of the brazing was cooling as I moved around the joint. It is only necessary to pin if you have no jig, or if you are going to heat the joint completely in a hearth and the tube might move as a result.
I also used my jig as a design tool; I could set up the jig to see if a design was feasible before I even started cutting tubes to length. Today you can do the same thing on a computer, making a jig unnecessary if you only plan to build one frame. It might be a good idea to do a full size drawing on a sheet of plywood or sheetrock, or at least a chalk outline on the floor so you can lay the frame on it for reference as you progress.
Some of the old time framebuilders used to braze the head tube to the down tube first using the bottom head lug. By measuring the angle with a protractor and ensuring this was correct to the drawing, everything else would fall into place.
Pinning the frame alone will only ensure that the tubes do not slip in or out of the lugs, the whole assembly will flop around like a jointed wooden puppet. You will need to braze each pin in place, in other words tack it. Then you can check for alignment, and the tubes will move on the pin and tack and stay where you place them. This brings me to the second question I was asked.
Why pin in the center of the frame? Could a pin be placed in the side of a bottom bracket for example. I have already explained if you tack on one side the tube will move in that direction as it cools. You would have a hard time realigning the frame as it would always have a tendency to move towards the original tack. Pinned and tacked in the center, you can move the tube either way to align it.
How about a pin on the right side of the bottom bracket to hold the tube as you braze the left side? Not a good idea. As the left side cools it will still pull to the left, and the pin will now be under stress. As soon as you apply heat to finish brazing, the bottom bracket shell will crack.
Should you use brass of silver? I always used brass, as did most European builders. Brass is easier to use, it melts when the metal is orange-red. If you go beyond to yellow you are too hot. Heat is controlled by constantly moving the torch. Even if you use silver, you will still need brass to braze the dropouts into the chainstays, etc, as silver is no use for filling large gaps.
A question I know will be asked. Why do I have a small hammer in my right hand along with the brazing torch? (Top picture.) If there is a small gap in the lug as I braze, I switch the torch to my left hand and keep the heat applied as I tap down the edge if the lug with the hammer. Then switch back and continue brazing.
There is a previous article I wrote on simple frame repairs, replacing tubes in a damaged frame is a good way to practice and learn framebuilding skills. I also mentioned some frame design software here.
 Dave Moulton | Comments Off |


Reader Comments (7)
Thank you. Terry talked about it all them time and use his/mine/others Fuso to show a point to others.
I went to the NAHBS show last week, beautiful bikes for sure. However, I think very soon folks are going to ask for a great riding bike besides just good looking bike.
Like a Fuso. Ron
...just built my first frame and what you've said here makes a lot of sense to me now. I read a similiar article on your website before I started building but couldn't really get my head around it then. But I'm still wondering:
Why you didn't pre-assemble the seat stays?
How do you offset the tubes in the jig? (I couldn't on mine)
I recognise that this is all very plausible for brass but does the same apply to silver? Particularly 56%? With silver there should be less distortion as you can work much faster at lower temperatures. Presumably you didn't use brass brazing your 753 frames?
If I could make a request for an article I'd love to hear you opinion on tube manufacturers and ther more legendary offerings like 753 and SLX.
Keep up the good work
Phelim
Craig