


Frame Jig.

In the mid-1980s I commissioned Photographer Mike Graves to take some photographs of my frameshop. Above is a picture of my frame jig used to assemble frames. My work area was not as messy as it appears here, but Mike took some artistic license and added some extra tools and fixtures to compose a more interesting picture.
The picture does however give me an opportunity to explain what was going on before Mike took over to create this picture. Frames were made in three separate parts, the main triangle, which is not actually a triangle as it is made up of four tubes. Top and down tube, seat tube and head tube.
The second part is the rear triangle, made up of chainstays, seatstays, connected by the rear dropouts. The third part is the front fork that is assembled on a separate jig not shown here.
The main triangle was assembled here then fully brazed out of the jig to allow the metal to expand and contract freely. There is less distortion and built in stresses that way.
The main triangle is fully brazed at this stage. The lugs have yet to be filled and polished, but the surplus head tube has been cut off and the head tube has been machined ready to take a head bearing. The excess seat tube has also been cut off and filed to the shape of the seat lug.
 At this stage the rear triangle is being assembled, so that it matches up with the main triangle.
This is evident by the seat stays left long at this point, to extend beyond the seat lug. (Pictured right.)
The seat stays at the rear dropout will be tacked in the jig, then fully brazed out of the jig.
The seatstays will be later cut to length and a machined seatstay cap will be brazed into the seatstay top end.
The main triangle and the rear triangle will both be finished filed and polished separately, because they are easier to handle and manipulate in a bench vise as separate smaller parts.
When the two parts are ready, they are assembled and brazed out of the jig to accommodate the distortion due to heat. Because the main and rear triangle were initially assembled in the jig, they will fit accurately out of the jig for the final brazing.
 This modified vise-grip (Above.) has two pieces of angle iron brazed to the jaws, these clamp onto the seat tube. A short piece of round tube is welded to one side, at right angles to the seat tube.

The seatstays are then clamped to this tube on the fixture with two engineers clamps. One shown here. (Left.)
The chainstays are held in place at the bottom bracket with a vise grip on the chainstay sockets.
Alignment tools are used to make sure a wheel will sit central in the frame.
Frames like the Fuso were made in batches of five frames all the same. So the set up in this picture will be used to make five rear triangles, for example. Each stage of the assembly process is repeated five times. With one exception.
Front fork blades, and chainstays were identical no matter what the frame size, so these were prepared ahead of time in batches of 20 or 30 pairs. Fork blades were bent (Raked.) slotted, tips brazed in, then fully filed and polished and cut to length.
Chainstays were cut to length, slotted, and the rear dropout brazed in. Followed by filing and polishing. One extra item, the right chainstay is flattened on the inside to clear the sprockets when the rear wheel is removed.
 This is where this little tool comes into play.
The thin end of the chainstay was placed in one of the slots, heated to a red heat, and hammered flat with a small hammer.
This was done prior to slotting the tube to receive the rear dropout.

 To Share click "Share Article" below.
 Dave Moulton


Retro-Mod: Pickin’ n’ Choosin’
Going Retro-Mod has its advantages. Vintage lugged steel frames (Sometimes in mint condition.) can be picked up at bargain prices, and the ride quality is often far superior to that of a modern CF or aluminum frame. So there is the money saving incentive, along with value for your buck.
A few ounces heavier maybe, but often that doesn’t concern the cyclist riding for exercise and pleasure only. Why not ride a bike that is a pleasure to ride? Going retro-mod you have the best of both worlds. The ride quality and handling characteristics of the vintage frame, with the wider gear range, and fingertip shifting, together with better stopping power the modern brakes offer.
Outside of vintage frame and modern component group, one can pick and choose, which saddle, bars and stem, and pedals. New or old school. Longtime friend and regular commenter on this blog, Steve Farner, emailed me this week to say he had switched back from clipless pedals to toe clips and straps, and also tubular tires.
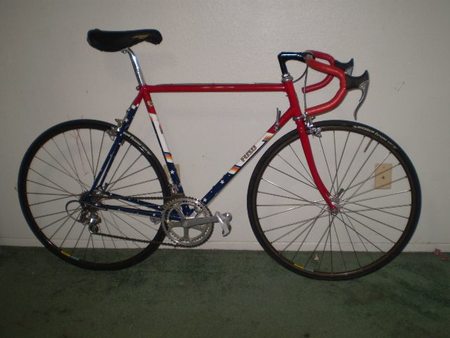
Steve raced back in the 1980s when toe clips and straps were the only option. When Steve went retro-mod back in 2014, he didn’t actually start with a vintage frame, but rather had Russ Denny build him a brand new retro style Fuso frame, with a level top tube, standard 1 inch and 1 1/8 inch tubes. The only exception was the frame had a plain steerer and a threadless headset. (See above.)
On his switch back to toe-clips, Steve said, “I have found getting into and out of toe clips almost silent. I get into the pedal quicker than clipless, and as a bonus, if you miss positioning, you just push on the other side of the pedal, without your foot slipping off as it does with carbon shoe bottoms and carbon or plastic pedals. Just keep pedaling and flip the pedal later.
I am riding Giro Empire shoes, which use laces and fit like a glove. The slotted cleats I use are Yoshida Champ Cleats. Keirin (NJS) approved, modern cleats used by Japanese Track racers. They fit on Look Three-Bolt modern shoes, using only two of the bolt holes. I also kept my old Vittoria shoes from my racing days, the 80's, and have cleats for them, and sometimes use those shoes, which still work fine, just not as stiff.
But the Giro Empires get into and out of clips just as well as the old shoes, and being modern are stiffer soles and good to know you can buy them today.
The pedals I bought are MKS Supreme Track pedals. (Above.) Again they are Keirin, or NJS, approved and are quite striking in appearance. I have kept Christophe Steel Toe Clips all these years, which don't break as easily as the aluminum variety. I also have kept my Alfredo Binda Laminated White (Bianchi) Toe Straps, which I think I paid $25 for in 1980, but sell for over $100 used on Ebay today!
I like them because they don't stretch, don't need the twist in the pedals to stay in place, and do not flop while in use. I use the Cinelli toe strap buttons, chrome in this case to match the pedals and clips, which I like better than others because you can pull the straps all the way through to set wherever you like on the strap.”
The other switch Steve made was back to tubular tyres. He said:
“The wheels I am now riding are DT Swiss 190 Ceramic Bearing hubs, DT Swiss S.S. round spokes, and Mavic Reflex Rims, 32-Hole. These are a nice, light, low-drag set that match the steel frame and set-up much better than the Mavic Ksyrium SL Limited I had on.
The ride is quite impressive! Kind of like the difference between driving a sports car and a Prius. No comparison. No wonder tubulars are still preferred by pros. You just have to know how to care for them, and fix flats.
All together I like how the bike looks. I think if Russ presented this appearance to customers, they would be enthused to own, and most importantly, ride one! Because it is the ride that stays with the owner long after the B.S. sales pitch of modern bikes and equipment.”
Unusually, Steve’s bike is all new. Rather than go Retro-Mod he has actually gone Modern-Retro.
Footnote:
Here is another related article on aligning slotted cleats.