Dave Moulton

Dave's Bike Blog

Award Winning Site

More pictures of my past work can be viewed in the Photo Gallery on the Owner's Registry. A link is in the navigation bar at the top

Bicycle Accident Lawyer


Powered by Squarespace
Search Dave's Bike Blog


 Watch Dave's hilarious Ass Song Video.

Or click here to go direct to YouTube.


A small donation or a purchase from the online store, (See above.) will help towards the upkeep of my blog and registry. No donation is too small.

Thank you.

Join the Registry

If you own a frame or bike built by Dave Moulton, email details to list it on the registry website at www.davemoultonregistry.com

Email (Contact Dave.)

 If you ask me a question in the comments section of old outdated article, you may not get an answer. Unless the article is current I may not even see it. Email me instead. Thanks Dave

Entries in Bike Fit (19)

Friday
Sep142007

Saddle Height

When it comes to bike fit everyone is looking for a magic formula. There isn’t one, because there are so many variables in the human body.

This doesn’t mean that formulas are of no use. As long as we accept their limitations, they can often be a good place to start.

An extensive study on bicycle design was done at Loughborough University (Pronounced Luff-boro.) in England in the mid 1970s. Part of their report stated that saddle height, measured from the pedal surface to the top of the saddle, was equal to 109% of a rider’s inside leg measurement.

The way they arrived at this 109% was by measuring the inside leg of a large number cyclists, and at the same time measured the height of their saddles. 109% was the average; in reality, most of the cyclists measured would have been above or below this percentage. This is the nature of averages.

The 109% is a place to start; the saddle height for most people is going to be slightly up or down from this. I like the idea of a percentage because the longer a rider’s legs, their saddle is going proportionately higher. This means a greater distance from the saddle to the handlebars, (Drop.) which is what the larger rider needs.

Inside leg measurement is something that causes confusion; in America, (Always trying to abbreviate the English language.) it is referred to as “inseam.” People become confused with pant size which is not surprising because pants have a seam, legs do not.

I have also heard talk of “Pubic bone height.” (PBH) The pubic bone is part of the skeleton and I don’t see how you can measure its height without x-rays. I always measured inside leg from the perineum to the floor, without shoes.

The perineum in simple non medical terms is the fleshy part that is in contact with the saddle. I usually say, “Crotch to floor without shoes,” but I am trying to eliminate all confusion here.

The way I would measure someone was first have the customer pull their pants up tight into their crotch to get an accurate measurement. Place the end of a steel tape measure firmly against the perineum, and measure down the inside of one leg to the floor.

If you are not sure of your inside leg measurement, the most accurate way is to have someone measure you in the way I have just described.

Let’s use for example an inside leg of 33 inches. If you don’t have a metric tape measure, it is 33 x 2.54 = 84 cm. (Rounded to the nearest centimeter.)

84 x 109% = 91.5 cm. Remember this is the measurement from the pedal surface in its lowest position to the top of the saddle.
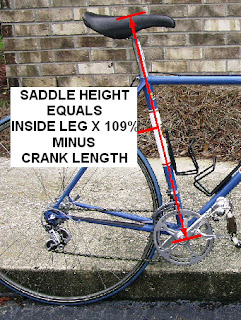
Deduct the crank length so you can measure from the center of the bottom bracket, which is easier. 175 cranks are in mm. so deduct 17.5 cm. from 91.5 = 74 cm. (See picture, left.)

I realize the distance to the pedal face is less than the crank length, but remember this is only a starting place. The saddle height will still need adjustment by actual riding experimentation.

The reason everyone with a 33 inch inside leg will not have the same saddle height is partly because of different shoe sizes. (Foot length.) A rider’s toe is pointing downwards at the bottom of a pedal stroke, a person with a longer foot needs the saddle higher, and vice versa for small feet.

Other factors effecting saddle height are the width of the rider’s pelvic bones, the width of the saddle, and whether the saddle is firm or soft.

Take a test ride, and if you can’t tell if the saddle is too high, or too low, raise it ¼ inch (6 mm.) and try again. It is easier to tell if a saddle is too high, rather than if it is too low. It is best to start on the high side and work down.

If the saddle is too high you will feel like you are stretching at the bottom of the pedal stroke, in extreme cases you will be rocking from side to side on the saddle. Come down a ¼ inch.

To pedal efficiently, legs need to move straight up and down like two pistons. The hip joint, like all joints, has a limit to its upper movement. To demonstrate this to yourself, stand in a doorway and support yourself, while lifting one knee as high as you can and hold it there with the other hand.

This is the upper limit to your hip movement. The only way you can make you knee go higher is to swing your upper leg outward, and your knee will then go another inch or so higher.

When pedaling, you do not want your legs splaying outwards at the top of each stroke; this is not an efficient way to pedal. If this is happening, your saddle is too low, too far back, or a combination of the two.

Leaning forward restricts your hip movement still further. Sit on the bike, leaning against a wall or a vehicle for support. In your lowest tuck position, see if you can lift your foot above the pedal when it is at the top of its stroke. In other words, you do not want to be at the absolute limit of your hip joint’s movement at the top of each pedal stroke.

Once you have your saddle set right, ride it for at least two weeks to become used to it. Then you can experiment by raising it small amounts 1/8 inch. (3 mm.) at a time. Ask yourself, “Does this feel better, or worse?”

Often raising the saddle slightly will immediately make you feel more powerful in your pedal stroke, and stronger while climbing. As the season progresses, you gain fitness, you loose fat from your backside, and muscles stretch, the saddle may need to go up again.

Friday
Aug172007

Position is all about comfort and efficiency

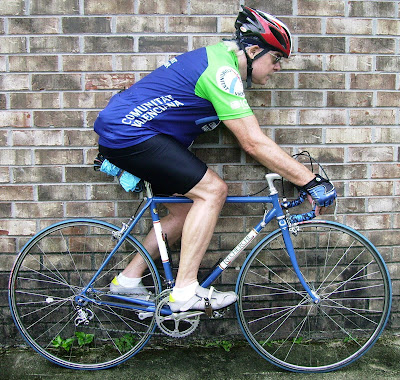
The above picture illustrates a riding position that is suited to someone like me. A body that is no longer as young and supple as it used to be, still wanting a position that is comfortable but aimed towards performance.

Back about 45 degrees allows me to look ahead without straining my neck. Handlebars low in relation to my saddle means that my weight is distributed between my arms and my seat. Arms not stretched, but relaxed and slightly bent.

Try not to view the saddle on a road bike as a seat, but rather as somewhere to park your butt while riding. This is why road saddles are often narrow, hard, and with very little padding. If you want to sit on a bicycle saddle, then you need to be sitting upright, and your saddle needs to be wide, soft, and possibly with some springs under it.

In this position you will never get past riding at a leisurely pace. If this is your goal then this is fine, but if you want some serious exercise, to ride a distance at a reasonable pace, or you have aspirations to race then you need to be leaning forward for three reasons.

1.) Aerodynamics
2.) Weight distribution
3.) Power transfer from your arms to your legs

Aerodynamics:
If you are racing this is important. With hands on the drops, arms bent, in a low tuck position, the back should be horizontal making the smallest possible frontal profile. To achieve this a rider needs to be top physical condition, usually young in years and very supple.

If you are less than top physical condition, you are never going to achieve or maintain a position like this. If you are not racing, aerodynamics is less important, but a rider still needs to be leaning forward for reasons of comfort and efficiency.

Weight distribution:
Weight should be distributed between the arms and your butt resting on the saddle. If you have too much weight on the saddle your butt is going to be sore. Too much weight on the hands and you will get numbness in the fingers. It is a matter of experimenting to find what works for you.

I hate to see a rider pushing on their arms to sit upright. With the arms stretched straight, muscles in the shoulders and at the back of the neck are constantly under tension. Road shocks are going straight up the arms to pound on these muscles.

Learn to relax and lean on your arms. Arms slightly bent, they will act as shock absorbers. Constantly moving the hands from gripping the brake hoods, to resting on the bars just above the hoods, will relieve pressure on the palms of the hands. Padded gloves help also.

Power transfer from the arms to the legs:
This is probably the most important factor because it affects not only efficiency, but also comfort in avoiding back pain. Imagine rowing a boat (one with a fixed seat.); your legs and feet hold your body in place and your arms and back provide the power to the oars.

Riding a bicycle is the exact opposite; your arms and back muscles hold your body in place, while your legs and feet provide the power. The power transfer is basically the same; arms and legs need to be in opposition to each other.

Imagine rowing a boat, sitting as you would on a dining room chair, with your lower leg vertical and your arms pulling horizontally. The strain would be on your lower back and you would soon experience severe backache.

When carrying a heavy weight, you hold it close to your body. If you carried it at arms length, the strain once again, would be on your lower back.

Often, not having the desire or ability to adopt a low racing position, the remedy often chosen is to raise the handlebars to bring them close to level with the saddle. Often a rider will opt for a larger frame to achieve this end.

Once again, if your goals are riding at a leisurely pace, this is okay. However, the problem with a larger frame is, it also has a longer top tube. Arms become stretched out horizontally, while legs are thrusting downwards, the result can sometimes be lower back pain.

Raising the handlebars seems obvious, but there is another way to achieve a less severe position. Leave the handlebars low, and shorten the reach; this was the option I chose.

When I started riding again last year after a long lay off, I soon realized due to limitations of my aging body, I could no longer ride in the same position I had used previously. I actually went to a one-centimeter smaller frame, which had a top tube that was a half-centimeter shorter. I then swapped my 11cm. stem for a 9cm.

Because of the smaller frame, my handlebars are actually one centimeter lower, but my reach is 2.5 cm. (1 inch.) shorter. The result is not only a more relaxed position, but one that is efficient and has good weight distribution.

One clue that my position is right; when climbing while seated I am rock solid in the saddle. One sure sign that you are too stretched out, is when you make a maximum effort, you slide forward on the saddle as your body tries to take up its natural position closer to your hands.

Another advantage of staying low but going shorter, if your fitness level and suppleness improves, you can simply lengthen your stem to achieve a lower aerodynamic position. Leaning more forward has the effect of lengthening your body, so you can use a longer stem and still have your arms opposing your legs.

Footnote: Unless you have specific problems with your position, I suggest you stick with what you have become used to. Always go by the old, “If it ain’t broke, don’t fix it,” adage.

Tuesday
Jun192007

Stand-over height has little to do with the correct size frame

When I started riding in the 1950s I rode a frame that was 4 or 5 centimeters bigger than I would use by the 1970s; it was the fashion of that time.

One of the reasons for this was that aluminum seat posts and handlebar stems were fairly new and were not as reliable as today, so by riding a larger frame we had less seat post showing and a shorter handlebar stem, resulting in less stress on those items. The big difference was the frame of the 1950s had very low bottom bracket height, as low as 9 1/2 inches. Because of this frames did not seem as big.

When I arrived in the US in 1979 it was as if I had gone through a time warp and landed back in the 1950s as far as the way bikes were set up and were being ridden. American cyclists at that time were riding larger frames than their European counterparts. The problem was these frames were designed with higher bottom brackets and I started hearing the term “Stand-over height.”

In my entire framebuilding career in England, this measurement was never once asked of me, and even today I could not tell you off the top of my head what the stand-over height is for and given size of frame I built.

To me stand-over height was something a bike store would do for a customer buying an inexpensive utility bike. They would pull out a bike; have the customer stand over it. If it cleared his crotch by an inch or two it would be close enough for the use intended.

When a rider got to the level of buying a top of the line racing frame, and he bought the size that fitted correctly, then stand-over height was not even an issue. If you could not stand over your frame then you definitely were using too large a frame. However, it was not the other way round; you did not talk about stand-over height first, or even mention it.

I am amazed that stand-over height is still being talked about today, I see it crop up all the time on the various forums; I see it asked of people selling frames on eBay.

The correct position on a road bike is all about efficiency. It is not just about a low tuck aero position; it is about getting maximum power to the pedals not only from the legs, but also from the arms, transferred through the back muscles. This means having the handlebars positioned low in relation to the saddle.

The problem arises when a person wants to use a road bike for more leisurely riding, and does not want that low position. They tend to use a larger frame to get the handlebars level with the saddle. However, a larger frame has a longer top tube, so any gain in raising the handlebars is lost because of a longer reach.

Now that road frames generally have sloping top tubes, they tend to run smaller than they did prior to the late 1980s. It is also a relatively easy matter to design a frame with a slightly longer head tube to raise the handlebars, and with clipless pedals, ground clearance is not such an issue. Maybe frame manufacturers should be thinking of lowering bottom bracket height for a non-racing frame.

Friday
May252007

Pedal Float

A subject I often see discussed on the various bicycle forums is clipless pedals, and pedal float. This is more by way of an observation than to give advice because clipless pedals came on the market in the last few years I was in the bike business.

For many years, we all used toe clips and straps, and there was no float in the pedal cleats. Which leaves me to wonder who in their wisdom decided when designing clipless pedals, the foot needed to have sideways movement (float) on the pedal?

Was it demanded by the riders, or offered as a sales gimmick by the manufacturers as something that the “old tech” pedals didn’t have? Because like every piece of new technology that comes on the market, consumers soon find they can’t do without it.

I understand that now some pro riders are going back to fixed cleats on their clipless pedals, and the many riders who try to follow suit have all kinds of problems with their knee joints, etc.

When I started riding seriously in the early 1950s, cycling shoes had leather soles, and cleats were nailed on. They came in a little packet with 20 or 30 nails per cleat. Luckily, this was in a time before God created tennis shoes, and every household had basic shoe repair equipment.

This included a shoemaker’s last or iron foot that you put the shoe on to nail the cleats in place. Imagine doing this for the first time, staring at a flat leather sole, with absolutely no indication where the cleat should go.

You nailed them on, went out for a test ride. If they were wrong, you came home, and ripped the cleats off with a pair of pliers. Then you had to find some new nails and start over.

We soon learned where the cleats should be. If they were misaligned, guess what? We had knee problems, just like riders with clipless pedals today. It seems to me that the real problem is, not with the pedal having float, but with the correct alignment of the cleats.


I still use toe clips and straps, and my cleats are aligned as follows. With the shoes side by side, soles and heels touching, the slots in the cleats are in a straight line across both shoes. You could drop a straight edge in the slot.

This means when pedaling, the inside of my foot is parallel with the crank arm. In addition, when I place the two shoes with soles facing, the slots in the cleats line up.

As usual, my post contains a little bit of history. If we look back at how we got where we are today, often the problems we encountered in the past are a clue to solving the problems of today.

Tuesday
May152007

When it comes to bike saddles, how level is level?


The general consensus among experts is that a bicycle saddle should be level. If the nose is pointed up, it will put pressure on the perineum and cause discomfort.

If the saddle is positioned sloping downwards, this will throw too much weight onto your arms. Weight should be balanced between your seat and your hands.

But, how level? I feel to get out the carpenter’s level is over kill. If the saddle appears to be level to the naked eye, and it feels comfortable, to me that is level.

There are also so many differing designs of saddles. On my bike (above) I have a Concor saddle that was popular in the 1980s. Its design is swept up at the back and if I were to place a level from front to back it would indicate the saddle pointing downward, because the back part is higher.

However, visually the part where I sit is level. Unless the top of the saddle is flat front to back, it can’t be level at all points. Bottom line is how does it feel? If the saddle is not obviously up or down at first glance, I would say you’re okay.

This last part is for men only; so ladies you can stop reading now...

If you get that burning sensation in your scrotum, it is probably because the skin is pinched between the perineum and the saddle. If you reach down in your shorts and lift your boys up clear of the saddle; a proper pair of cycling shorts will hold them in place and this usually takes care of the problem.

Ladies, if you are still reading, don’t you do anything you are told?